In AutoCAD, you can make simple points using the POINT or PO command, these points are also called nodes.
To make the point simply type PO press enter and then click at a point on the drawing area or specify the coordinates of the point where you want to make the point.
By default, the point will appear as a single dot in the drawing area and you can take reference of these points to make your drawing.
The points will not be selectable by default, to make these points selectable activate node option in the object snap status bar option as shown in the image below.

Changing point type
The default point is the very small pixel sized dot which is great for most of the uses like making a reference.
But you can also change the default point style using PTYPE command.
70 lessons| Easy Level
If you are absolute beginner of AutoCAD then you can get started right from scratch using this free course.
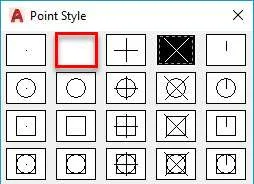
Type PTYPE on the command line and press enter, Point Style window will open with a list of available point styles.
You can select any other point style from this list of points and click OK to apply the point style.

If you have already made points with a different point style and then you change the point style at a later stage then all those point styles on the drawing area will also change to the new point style.
If for any reason you want to hide points from the drawing area or if you don’t want to plot the points then you can simply select the second point in the Point Style window which is represented by a blank box as shown in the image below.
Alternatively, you can also put the points on a no plot layer or you can use hide or isolate tools of AutoCAD.

You can also use PDMODE command to change the point type directly from the command line.
The default value of PDMODE is 0 which makes a pixel sized point.
You can change this to any value from 0 to 4 to change the point type as shown in the image below.
In this case changing the value to 1 will hide the point from drawing area.

You can see a list of all the PDMODE point types and their associated value on this AKN page.
Changing point size
By default, the point size will be relative to the size of the screen and zoom command will not change the size of the point.
You can set the relative size of point using the point size option which is set in relative percentage as shown in the image below.
You can set the percent value to higher number to increase the size and vice versa.
With relative point size zooming in and out won't change the point size, even if it does you can type RE and press enter to refresh the screen adn the size will return to normal.
70 lessons| Easy Level
If you are absolute beginner of AutoCAD then you can get started right from scratch using this free course.
But you can also change this property to make points of an absolute size which changes in size when you zoom in or zoom out.
Type PTYPE and press enter.
Select “Set size in Absolute units” radio button and specify the size of the point which you want in the Point Size field as shown in the image below.
Make sure you select any point type other than first and second point types.

Click OK and now you will notice that your points will remain constant in size even when you zoom in, zoom out or regenerate your drawing.
Do you have questions related to point styles? Let me know in the comments below.
Using points
Points are usually used in AutoCAD drawings as placeholders when you divide an AutoCAD object.
So, when you divide a segment using DIVIDE or MEASURE command it will add points at the point of division and you can change the point style to make the size of those points prominently visible.
Another use case for points is in importing coordinates from excel to AutoCAD.
In that case the point will be added at the coordinates mentioned in the excel sheet and here again you can change the point style just in case you want to show it prominently.
Summary
So, that's all about making points and modifying it in AutoCAD.
If you have questions do let me know in the comments down below.


