AutoCAD generally supports two type of fonts TrueType with TTF extension and shape font with SHX extension.
TrueType is Windows native font type which comes ready-made with your windows installation but shape fonts are AutoCAD specific fonts which are installed along with AutoCAD.
In this article, I will explain methods of installing both the types of fonts and the best practices for transferring files containing these custom fonts.
I have created this video as well which explains this entire process in detail but if you prefer the article then read on.
Installing Truetype Font
To install the TrueType or TTF font simply right-click on it and select Install from the right contextual menu as shown in the image 1 below.
For installing this font, you need to have administrator access on your PC.

Once the font is installed close the AutoCAD window completely and restart a new AutoCAD session, the font will now be among the list of fonts.
Installing Shape Font
Installing a shape font is a little bit different from installing a Truetype font.
In this case, you need to copy paste the SHX font file in the font directory of AutoCAD installation.
70 lessons| Easy Level
If you are absolute beginner of AutoCAD then you can get started right from scratch using this free course.
You can find the path of SHX fonts using options window.
Type OP on the command line and press enter, then select File tab and expand the Support File Search Path tree and you will see the path where SHX fonts are installed as shown in the image 2 below.

Go to “C:Program FilesAutodeskAutoCAD 201XFonts” folder where X represents the version number of AutoCAD and copy paste the SHX font file.
You will need administrator privileges for copying this font.
Once the fonts are copied restart the AutoCAD session and you will have your SHX font in the list of AutoCAD fonts.
Transferring files with custom font
The fonts mentioned in the article above are installed on your local PC and when you use them in your drawing it will remain visible only on your PC.
If you transfer this AutoCAD file containing custom font to the recipient who does not have this font then AutoCAD will display a substituted font or it will not display text at all.
To get rid of this problem you need to ensure that fonts are always captured with your drawing.
70 lessons| Easy Level
If you are absolute beginner of AutoCAD then you can get started right from scratch using this free course.
You can do that by E-transmitting your drawing with the font.
If you are transferring the file as PDF then you should ensure that TTF fonts are captured in the PDF file and shape fonts are converted into geometries because PDF’s does not recognize shape font.
To transfer the drawing with fonts, save your drawing then type ETRANSMIT and press enter.
Click on transmittal setups button on the Create Transmittal window and select Modify.
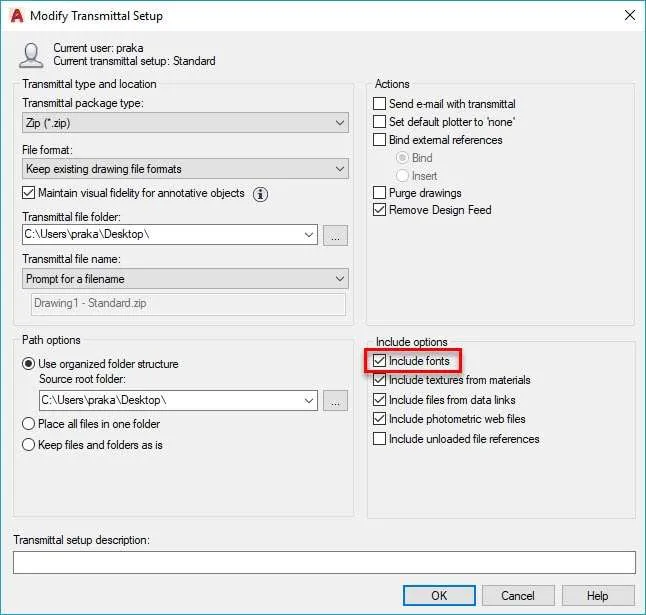
In the Modify Transmittal Setup window select the Include fonts check box as shown in the image 3 below and click on OK to close all open windows.
Your transmittal package will now contain any additional fonts used in the drawing.

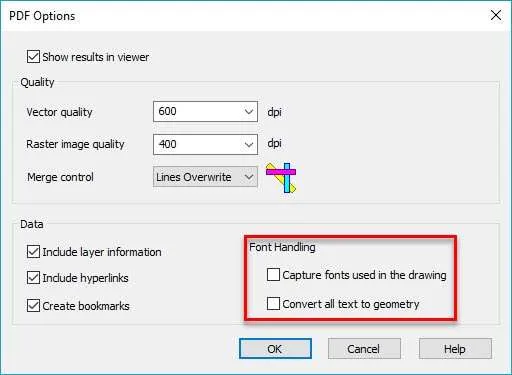
If you are transferring drawing using a PDF plotter then ensure that fonts are either captured in the PDF or they are converted into geometries.
To do this select the PDF plotter like DWG to PDF.pc3 from the Plot window.
Then select the PDF Options button and then ensure that “Capture fonts” option is selected for TTF fonts or “Convert all text to geometry” option is checked for shape fonts as shown in the image below.

Summary
So, to summarize it all, it's better to use native fonts as they are pre installed with AutoCAD and will work for all the drawings.
But just in case it's important for you to use custom fonts don't forget to share it with your drawing so that it can be used by other stakeholders easily using the steps mentioned in this article.


