In this article, I will take you through the step by step process of using Revit Matchline and View reference tools.
I will also share all the Revit tips and tricks to make the best use of Matchline and view reference tools.
Understanding Matchlines
So, what are Matchlines in Revit?
Matchlines are elements in drawings that signify the connection between different sections or sheets.
They act as visual indicators, allowing the Architect, Engineer, Revit designer, stakeholder, document controller, etc. to understand how different parts of a building design fit together.
With Revit's Matchline tool, you can easily create, modify, and manage these critical elements with precision.
Understanding View References
View References, on the other hand, enable you to link views across multiple sheets or sections within a Revit project.
They act like the legend guide for your drawing.
By establishing these references, you can ensure consistency and coherence throughout the design documentation.
66 lessons| Easy Level
This course is for an absolute beginner of Revit architecture software. If you want to get started right from scratch then this is the course for you.
Whether aligning floor plans, elevations, or sections, View References simplifies navigating and comprehending complex building models.
I will take you through a comprehensive way to create your Revit Matchlines and incorporate them into your final sheet for plotting.
Here is a picture showing the Revit Matchline and View Refence in the context of a drawing.

Using Revit Matchlines
So, where do you get to use Revit Matchlines?
When you are working on large floor plans or layouts, it becomes quite chaotic to fill the entire layout onto a single sheet while at the same time ensuring that all elements are visible.
The Matchline tool enables you to split your layout into several areas that can fit into your sheets seamlessly.
But this tool itself will not split the areas automatically, rather it will create reference planes that can be used to link the different parts of the layout into one.
You will find the “Matchline” tool in the “View” tab under the “Sheet Composition” panel as shown in the following image.

Before even creating your lines, you need to decide how many splits you will want for your layout, in this case, I will be using 3 splits for the entire layout.
Duplicate as a Dependent
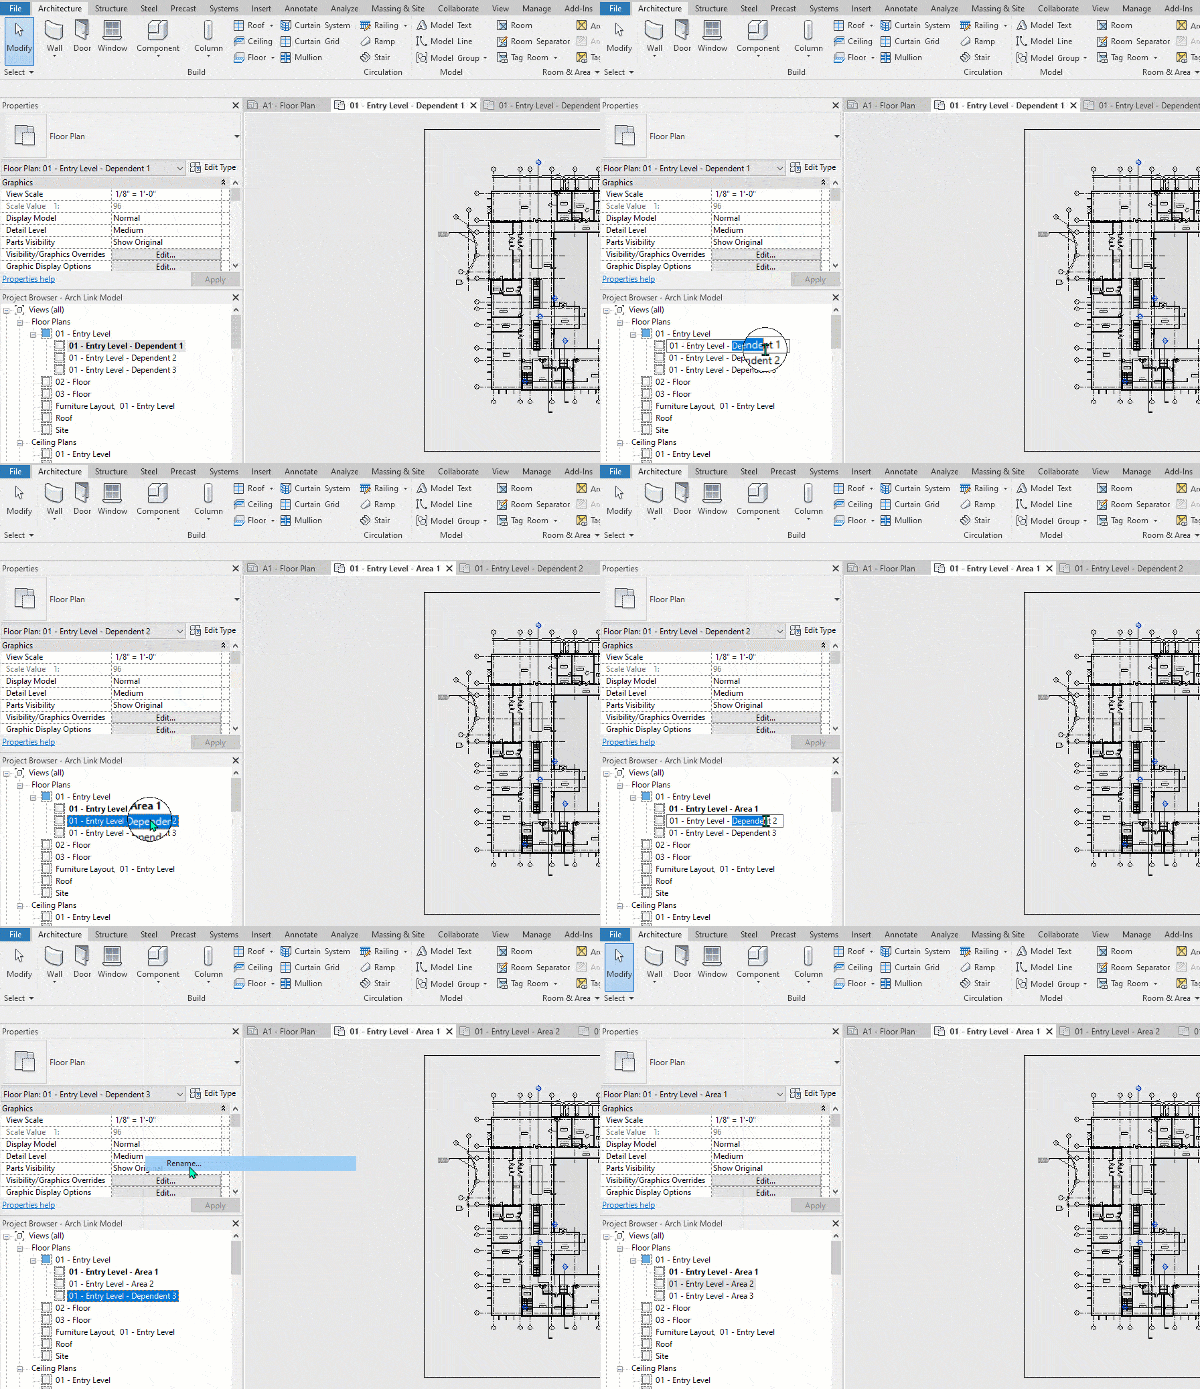
You will need to be within the floor plan that you desire to split, and then you will create duplicates that are dependent on the main drawing, as shown below.

For this demonstration, I will be using the sample drawing that comes with Autodesk Revit named “Arch link Model” and is located in the following folder path:
{Your Revit folder}:Revit_2023Revit2023Revit 2023Samples
You will need to first right-click on the name of the floor plan, then a list will pop up.
In this list navigate to the “Duplicate View” which has a side list within in, then click on the third option, which is to “Duplicate as a Dependent”.
After doing that, you will see that another floor plan view will be created under the main floor plan tree, and a tab window will be added as shown below:

Because in this case there are three splits, you will have to duplicate the main floor plan by repeating the steps above.
Make sure you do not duplicate from an existing dependent view.
After successfully creating the dependents, you will have something like this:

The next step will be to rename your new floor plan view to make it easier for the drawing reader to interpret.
In this case instead of “Dependent 1”, update it to “Area 1”, the same for the consecutive views.
To rename your view, simply select it in the tree view, then right-click it and a list menu will pop up.
Then select “Rename”, but make sure to use your arrow key to avoid erasing the entire existing name as shown below:

Placing your Matchline
Because we created dependents from the main floor plan, any modification you do on the main floor plan will be updated in the three consecutive drawings.
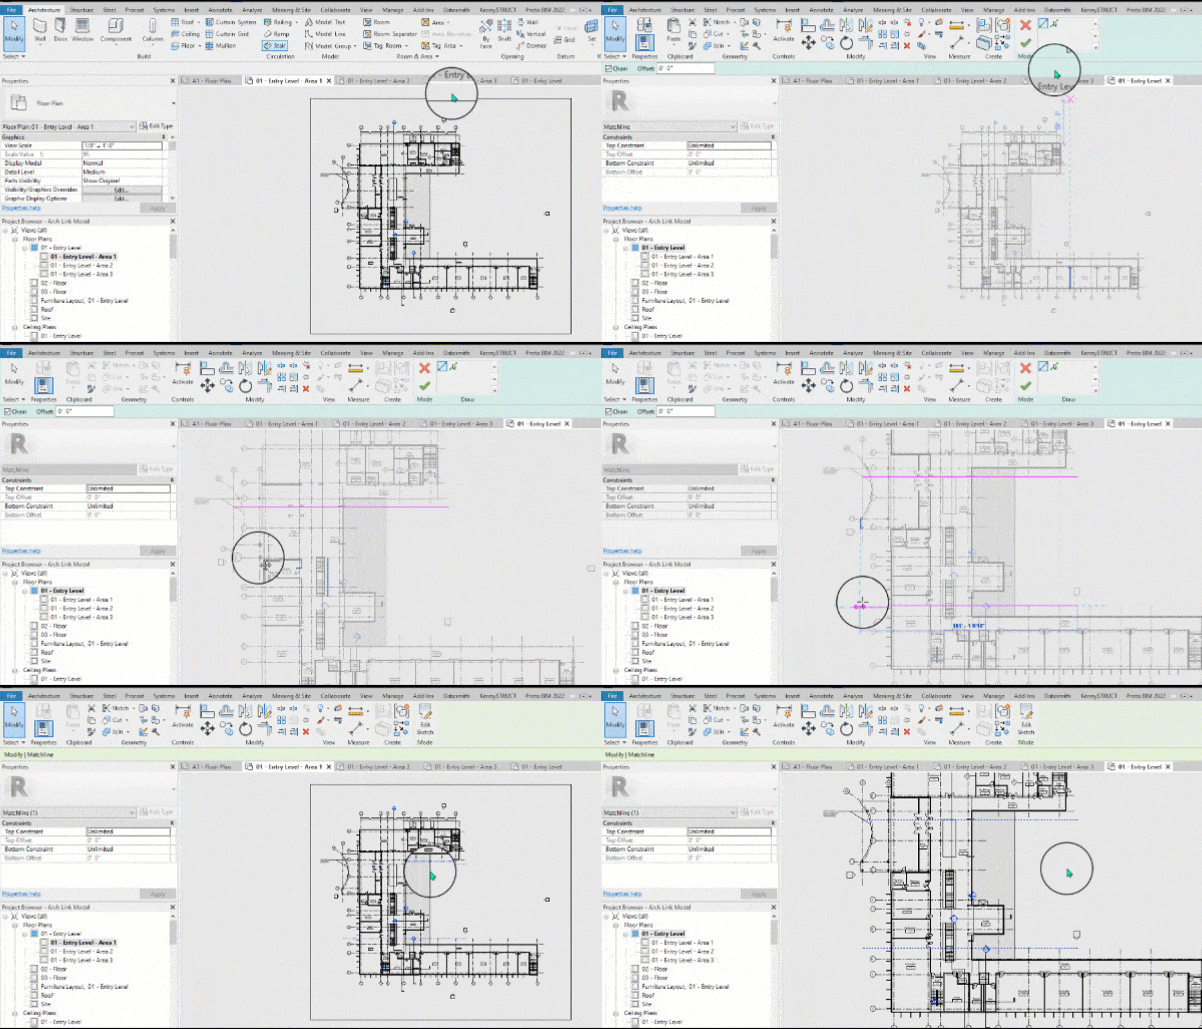
Note: The Matchline can only be created as a straight line using either of the two options, “Draw Line” or “Pick Line.”
You can either check the “Chain” option to allow you to place your matchline continuously or uncheck it to place only one line at a time.

Plus, you can opt to offset your matchline from a particular point that you are doing at.
In this case, activate your main layout, then navigate to the “View” tab, under the “Sheet Composition” select the “Matchline” command and create three matchlines at your point of preference as shown below:

Placing Area Annotation
To make it easier for referencing, you can create simple annotations showing the name of each area associated with the matchline.
Still having the main layout activated, navigate to the “Annotate” tab in the “Text” panel, click on the “Text” command, and create the text adjacent to the matchlines as shown below:

This helps greatly in linking the matchlines into one complete drawing.
Cropping your Dependent Views
Once you are content with how the Matchlines look in each of the Dependent views, activate each view consecutively and, using the properties setting found on your left-hand side, navigate to the “Extent” option and crop as shown below:
Just a note here, there are two types of crops, the first being the “Crop View” which is responsible for cropping out all the unwanted parts on the drawing (represented by a continuous line).
The second one is the “Annotation Crop," which crops out annotation labels and matchlines (represented by a dotted line).
66 lessons| Easy Level
This course is for an absolute beginner of Revit architecture software. If you want to get started right from scratch then this is the course for you.
Always make sure that the Matchline linking two different areas is visible on each crop window.
Additionally, you will realize that the “Section symbol” does not get cropped out automatically.
All you would need to do is click on the symbol and resize it.
But be careful not to change the scope of the section when using the adjacent grips:

Placing View References
After you have finished cropping your three dependent views as shown above, the next thing that you will need to place your drawing is the “View Reference”.
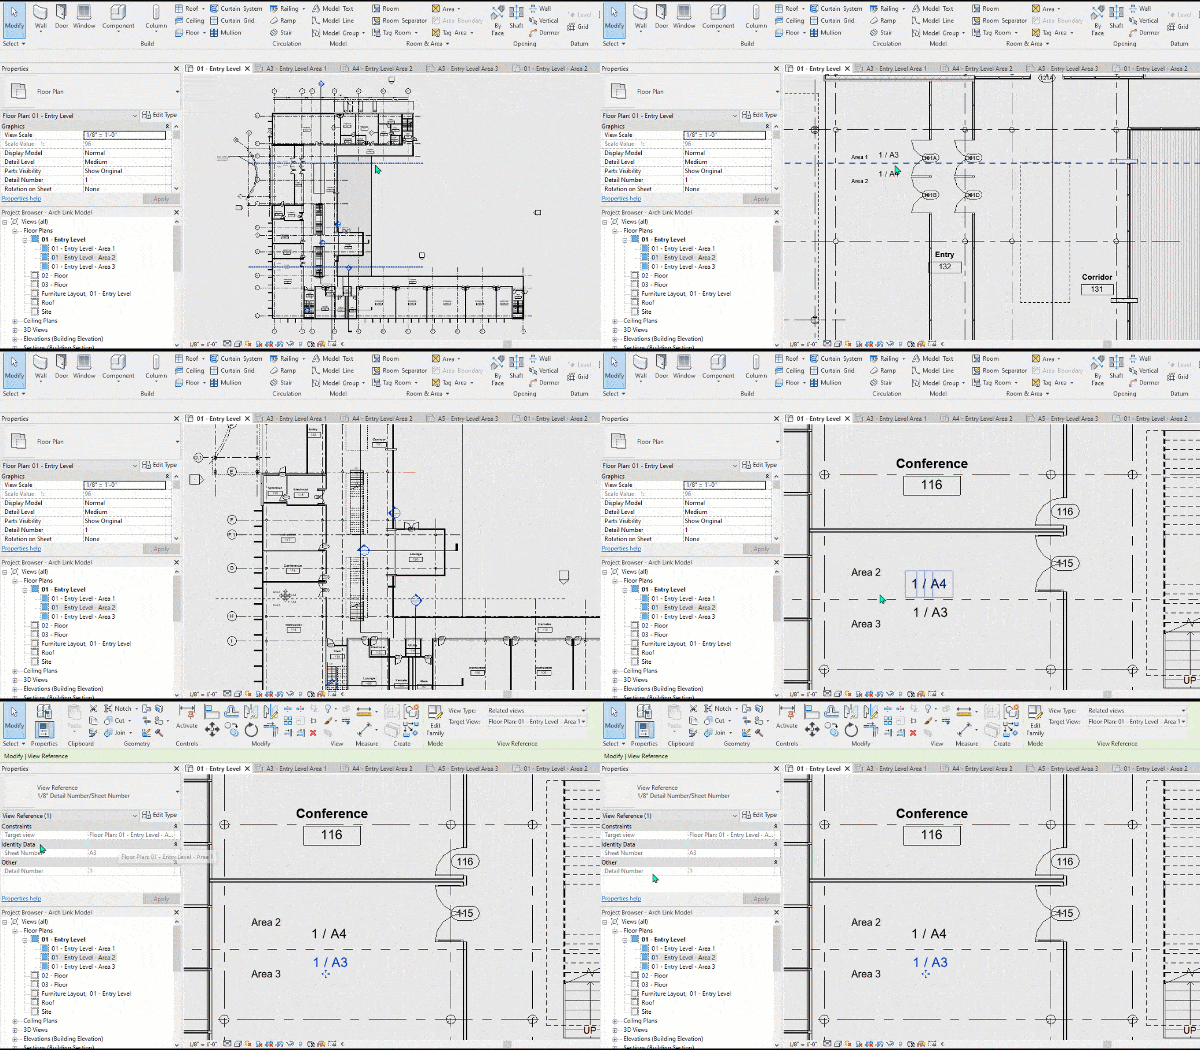
Open your main drawing, navigate to the “View” tab, and under the “Sheet Composition” panel, select the “View Reference” command.

Once you click on the command, a reference indicator will be displayed, and you can place it adjacent to your Matchline on both sides, as illustrated below.
After successfully placing your reference markers, click on each at a time as shown above, and a “View Reference” contextual ribbon will appear.

Within the “View Reference” contextual ribbon, under the “Target View” update it to correspond with the dependent-view that you created above.

To add the View Reference family to your project, all you have to do is use the "Load Family" button on the Insert tab to bring it in from the annotation folder in the library.
Keep in mind that the Matchline won't work if you don't load a tag.

You will find the tag in the following folder:
C:ProgramDataAutodeskRVT2023LibrariesEnglishUKAnnotationsArchitectural
Placing on a Sheet
Just like that, you are done!
It is time to place your dependent views on a sheet, and you will see all the magic!
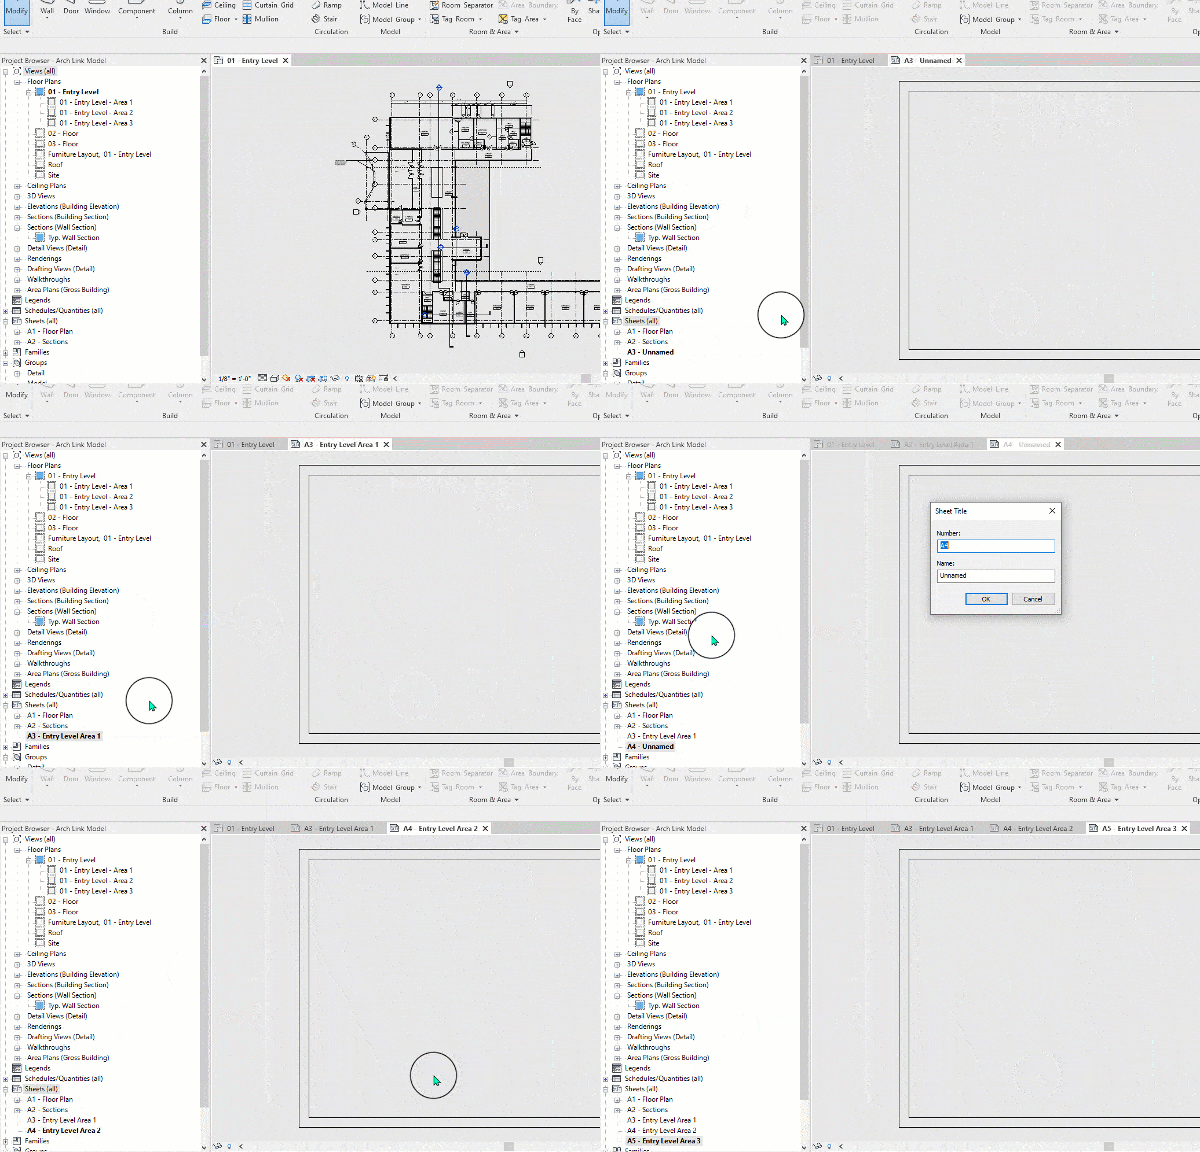
Navigate to the “Sheets” found within your Project Browser area, then right-click to access more options, and a list menu will popup, select the “New Sheet” option.

After clicking on the “New Sheet” option, the “New Sheet” window will pop up, and you will be prompted to select a title block for your sheet.
In this case, select “A1 metric,” and under the placeholder sheets, it will be “New” by default.
Then click on "OK”, and a new sheet will be added to your sheet list tree.
Right click on the newly added sheet and select the “Rename” option from the popup list menu.
In this case, we will rename it from “A1 - Unnamed” to "Entry Level Area 1”, as shown below.

After repeating the above steps for the other two dependent drawings and naming them with respect to the area they cover, the only thing pending will be to drag your drawings into your respective sheet, as shown below:
After placing the views in the sheets as shown above, if you double click on the main drawing, in our case, “01 - Entry Level”, and check the “View Reference” tags, you will find that they are now updated to show the “Sheet Number” and “Detailed Number”.

Frequently Asked Questions
Here are some common questions that we get related to Revit Matchline and view reference.
Can you use different scales between different views?
This is not possible because one of the views will appear either bigger or smaller than the others.
The illustration below shows how reducing the scale for the view will make the view on the sheet smaller, resulting in it not matching with the other reference lines.

Can you tag a matchline in Revit?
In Revit, while you can't directly tag matchlines as standalone elements, you can still annotate matchlines effectively using various methods within the software.
As shown above, we have used two techniques to annotate our matchline, the text annotations and the view reference tags as shown below:

The other methods that you can use to to annotate matchlines in Revit are:
1. Detail Lines
Revit allows you to create detail lines, which are non-graphical elements used for annotation purposes.
Detail lines can be drawn directly over matchlines to highlight their location and significance within the design.
2. Detail Components
Detail components, such as symbols or markers, can be placed adjacent to matchlines to draw attention to them.
66 lessons| Easy Level
This course is for an absolute beginner of Revit architecture software. If you want to get started right from scratch then this is the course for you.
These components can serve as visual cues to indicate the presence of matchlines and their relevance to the overall design.
3. Viewport Titles
When referencing views across multiple sheets, viewport titles can be used to display information about the view being referenced.
Including descriptive titles within viewports helps you understand the relationship between different views and sheets, including the presence of matchlines.
Summary
In conclusion, Revit's Matchline and View Reference tool is a key part of making coordination work easier in building planning.
We have covered the Revit Matchline and view reference tools in our Revit architecture complete course.
If you have questions related to Revit Matchline and view reference tools then let me know in the comments down below.


