In this article, I have included as many scenarios as possible where scaling is required and I have explained them with relevant examples.
Simple Scale command
Using scale command you can change the size of an object in AutoCAD.
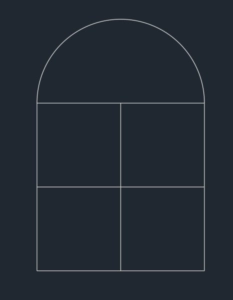
To explain scale command I will use this simple window block which has the size of 10 unit along the X-axis and 15 units along Y-axis.
Select the scale tool from Modify panel of the home tab or use its command SC.

Now select the window drawing and press enter. Now you need to select the base point.
The base point will remain fixed when the object is scaled, in this case, I am using the lower left corner of the window as the base point.
The command line will now prompt you to specify the scale factor. This scale factor actually determines the final size of your window.
A scale factor of 0 to 1 will decrease the size of your object (in this case window).
For example, a scale factor of 0.5 will reduce the overall size of your drawing to half of its original dimensions and a scale factor of 0.25 will decrease the size of the object to one-fourth of the original size.
70 lessons| Easy Level
If you are absolute beginner of AutoCAD then you can get started right from scratch using this free course.
Similarly, scale factor greater than 1 will increase the size of the drawing.
For example, a scale factor of 2 will increase the size to twice of its original value and a scale factor of 3 will increase the size three times.
Enter the scale factor and press enter.
In this case, I am using a scale factor of 2, the final size of the object will become 20 unit along the X-axis and 30 unit along the Y-axis.
Additional tip: If you want to keep the original object even after changing the scale then click on “Copy” option from the command line when prompted for the scale factor.
Scale using reference
Consider this scenario, we have the window used in the previous example with the length along the X-axis 10 units and height of 15 units.
Now we want to change the size of this window so that the length along the X-axis now becomes 17 unit and the height should change proportionally.
Now, in this case, you can use the “Reference” option of scale command to change the size of the object.
Once again start the scale command and then select the window and press enter.
Now specify the lower left corner of the window as the base point, you can use any other base point as well if you want.
Now the command line will prompt you for scale factor, on this prompt click on the Reference option from the command line.
Now the command line will prompt you to specify the reference length. Type 10 and press enter, this is the current length of the window along the X-axis.
Now command line will prompt you to specify the new length which you want for the 10 unit line of the window. In this case type 17 and press enter again.
Now the base of the window will become 17 units in length and height of the window will automatically change proportionally.
As you can see, this command is quite useful if you want to change the size of an object with reference to other existing objects or any reference length and in this case, you obviously don’t need to specify the scale factor.
Scaling AutoCAD Blocks
The scale commands explained above will work for AutoCAD block references too and you don’t need to use any special property to scale blocks.
However, you can scale your blocks with different scale factors along the X, Y and Z axis which I will explain here.
I will use this drawing of a simple chair to explain this.

First, we need to convert this simple object into a block and for that, you can use B command.
We have a course as well where you can learn all about AutoCAD blocks.
Just make sure that while creating the block you keep “Scale Uniformly” box unchecked as shown in the image here.

Once you have your block prepared you can change scales and then insert it in your drawing.
To insert the block use I command.
Type I and press enter, the Insert window will show up. In this window, you can assign the scale of the block along X, Y and Z axis separately.
If you keep the value of scale factor same along X, Y and Z axis then the overall size of the block will change.
Let’s use the scale factor of 1 along the X-axis and 1.5 along the Y-axis, I will keep scale along the Z axis as 1.

Now click OK and click at a point to insert the block.
The block will look like image B shown below where image A is the original block at the overall scale of 1.
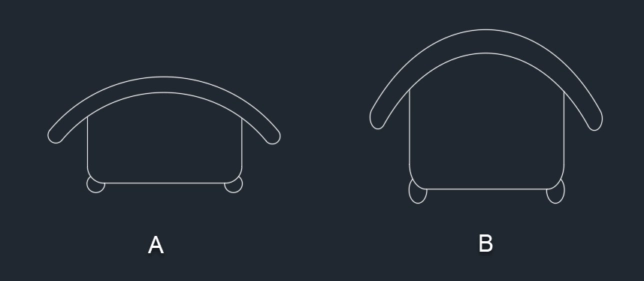
As you can clearly see the block, in this case, will be scaled to a factor of 1.5 only in the Y direction and not in any other direction.
Scaling xRefs and images
xRefs or external references are entities like DWG files, PDF or images that can be inserted in a drawing as a reference.
You can scale your xRefs while inserting them or you can change their size even after inserting them into the drawing.
For this example, I will use a DWG file but you can use the same method for PDF file and Images.
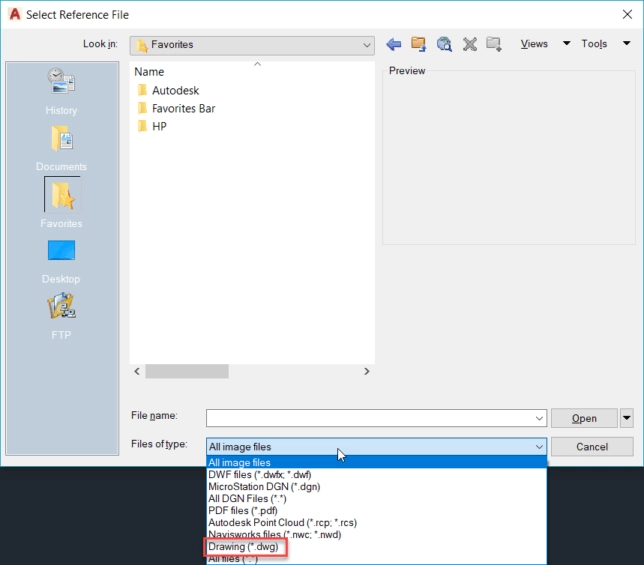
Type ATTACH and press enter, the attach window will open up.
Select DWG from the format dropdown as shown in the image below.
Now select the location where your file is saved then select the drawing and click on open.
The xRef window will open up where you can assign different scale for different axes and you can even keep it at 1 for all the axes to keep the original size of attached xRef.

Even after adding the xRef you can change it's scale using the property palette.
Just select the xRef from drawing area then type PR and press enter.
The property palette will open up, scroll down in the palette and change the scale from the geometry tab of the property palette.

You can also use scale command to change the overall scale of the attached xRef.
In a similar way, you can change the scale of attached images and PDF files. Here I will attach an image of the floor plan to explain it.
Type ATTACH and press enter then select an image and click OK. Specify a point in the drawing are to insert it and press enter to accept the default scale of 1.
After inserting the image in my drawing it looked like this.
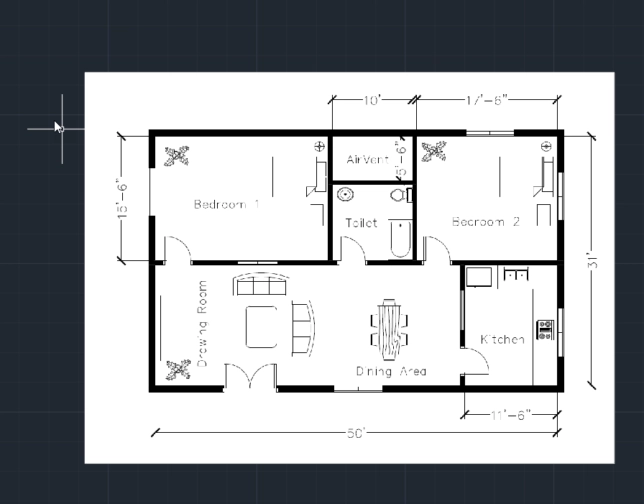
This image is not properly scaled i.e. the 10′ length on the image is not actually 10′ on the drawing.
To fix this we need to scale this image again with reference to any existing dimension in the floor plan image.
Let’s take the reference of 10′ length which is on the top of this floor plan.
Type SC and press enter to start the scale command. Now select the floor plan image and press enter again.
70 lessons| Easy Level
If you are absolute beginner of AutoCAD then you can get started right from scratch using this free course.
Click on the top left corner of the image as the base point and then select the reference option from the command line.
Now click at point A then point B (refer image below) to specify the reference and type 10′ and press enter again.
Now the distance AB on the image will change to 10′ and other distances will adjust accordingly.
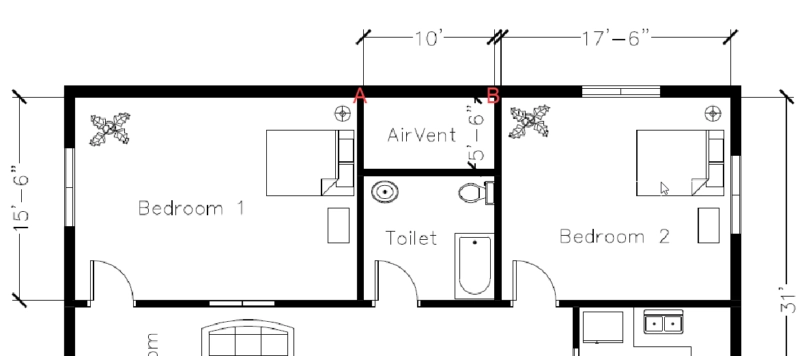
In this case, I have used Architectural units so make sure you change the unit to architectural before using scale option in this example.
To change it to Architectural type UN press enter and then select Architectural from Length drop-down as shown in the image here.

Scaling Hatches
When you add hatches in any closed area it may appear like a solid pattern or it may not appear at all.
Often times this happens because of the improper scale of hatches which can be easily adjusted from hatch creation panel to make them look right.
Start hatch command from the Draw panel or use its command H. A temporary hatch creation tab will show up.
Select the hatch pattern and then specify the area where you want to add the hatch.
If the size of the hatch pattern is very small or very large then change its scale from the scale field of properties panel as shown in the red box of the image below.

If the pattern is very small then you need to increase the value in the scale field and if the pattern is widely spaced then you need to decrease the scale value.
Here is how my ANSI 31 hatch pattern looks on a scale of 1, 0.05 and 50.
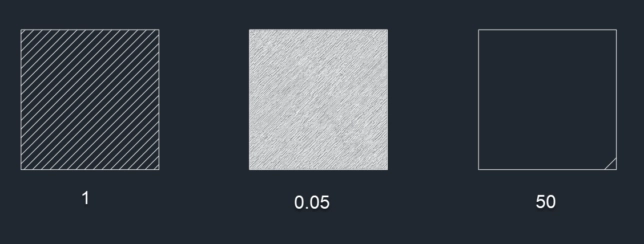
Even after adding the hatches if you select them again, it will open the hatch creation tab from where you can again modify the hatch scale or other properties.
You can also change the hatch scale from property palette, just select the hatch pattern, then type PR and press enter.
This will open the property palette, scroll down to the Pattern section and change the scale as shown in the image below.

Scaling Viewports
Drawings are often made in model space but text, title blocks and other required information related to drawing are generally added in the layout or paper space.
In this section, I will explain methods of creating viewports in paper space and changing their scale to fit the drawing.
I am using this simple elevation drawing to explain this feature.
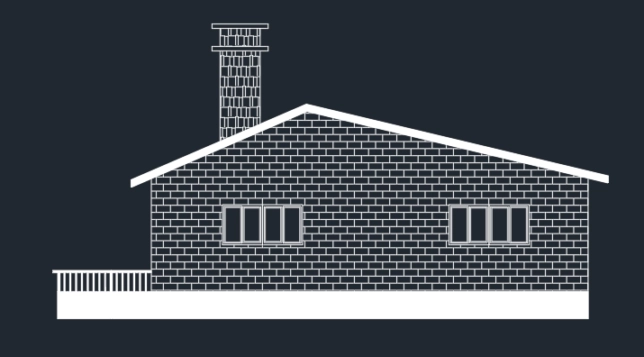
This drawing is in model space but we will insert this one in viewports of different scale in the layout.
Start by selecting Layout 1 from the bottom left tabs, you can also hit the + icon to make a new layout tab.
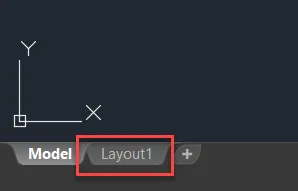
The layout space will open up with a default viewport and your model space drawing will be automatically added in it.
Delete the existing viewport and then click on the Page Setup option from the Layout tab as shown in the image here.

Click on Modify button in the page setup manager window and change settings of the layout like printer/plotter and page size.
I have selected DWG to PDF.pc3 in the plotter and ANSI A as the paper size.
After making these changes click OK to exit all open windows. Now we are all set to make our viewports.
Type -VPORTS and press enter (don’t forget to add the dash before vports).
Now click at a point close to the top left of the layout well within plotter margin and then click at another point to make a rectangular viewport.
Repeat the command and make two more rectangular viewports in the same layout view.
After making all the viewports your layout space should look like this.
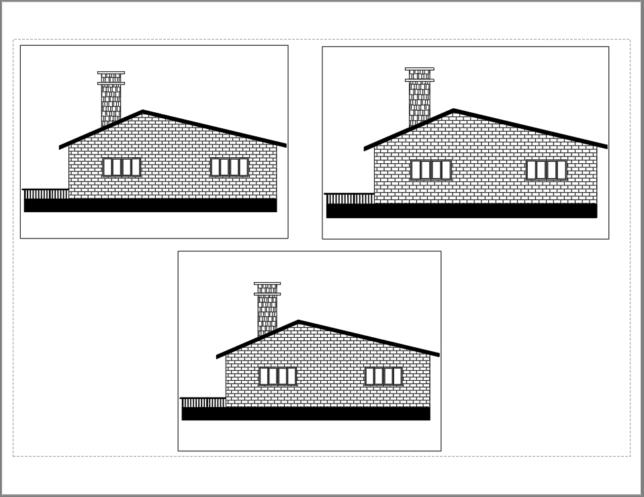
Currently, the scale of drawing inside the viewport is automatically set by AutoCAD but you can change it manually.
To change the scale select the viewport boundary then change the scale from scale option of the status bar as shown in the image here.
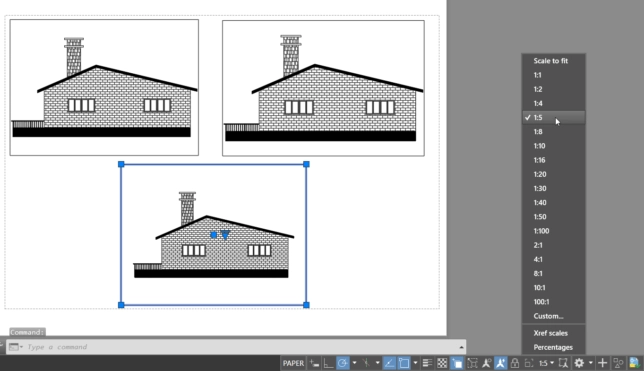
If the scale which you want to use is not available in this list of viewport scales then you can add your own custom scale too.
To add the custom scale select any viewport then click on scale option from the status bar as shown in the image above and select the Custom option from the list of scales.
“Edit Drawing Scales” window will open up. Let’s assume that we want to add a scale of 1:6 in this list, for that click on add button.

In the name field of the next window add 1:6 and then add 1 in the paper unit and 6 in the drawing unit field.
Click OK to accept the changes and close all open windows.
You will notice that your new scale is now added to the list and you can now use it in your viewports.
You can also watch the video shown below to know more about scaling drawings in paper space or layouts.
Summary
So, this was all about using scale option in different tools and features of AutoCAD.
There are still some features like the Annotative scale in AutoCAD and use of scale in layout space which I have I have not included here as they are discussed already in relevant articles and videos.
Understanding scale is also an important topic from the perspective of AutoCAD certification exam.
I have seen at least one question related to scale tool almost in all exams that I have appeared in so far.
Finally, I hope you will find this article useful, if you have any question related to this article let me know in the comments below and don’t forget to share the article.

