Point filters in AutoCAD help in selection of some predefined points visually from drawing area by clicking on it.
This feature is especially helpful for entering points in 3D but you can also use it in 2D drawings with the same efficiency.
Although point filters might seem very intimidating to you in the beginning but with practice, you will be able to save a good amount of time with it.
Point filters in the 2D drawing
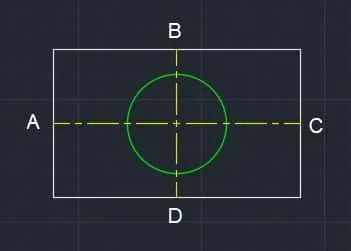
Let’s take an example of the image below.
Here we will make the circle in the center of the rectangle with the help of point filters.
Type C on the command line and press enter to start circle command.
Now press and hold the shift key and right click, a contextual menu will appear select point filters from this menu then click on .X from sub menu that appears.
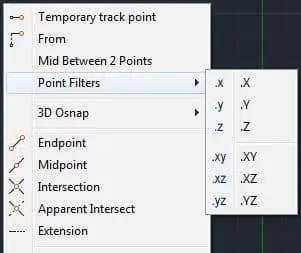
Now click on point B of the rectangle.
This tells AutoCAD to take X coordinate of point B and assign it to the X coordinate of the center of the circle.
In the rectangle above X coordinates of both B and D points are same so you can also select point D instead of B.
Again press and hold shift key then right click and select point filters from the contextual menu and select .Y from the sub menu.
Now click at point A or C this will assign center of the circle with Y coordinate of A or C and in this case too Y co-ordinates of A and C will be same as Y coordinate of the center of the circle.
70 lessons| Easy Level
If you are absolute beginner of AutoCAD then you can get started right from scratch using this free course.
Now command line will prompt you to select a value for Z coordinate and since you are working in 2D workspace press 0 for Z coordinate and press enter.
A circle will start from the center of rectangle and command line will now prompt you to select a radius value for circle.
Enter radius and you will have your circle exactly at the center of the rectangle.
Using Point filters for 3D drawings
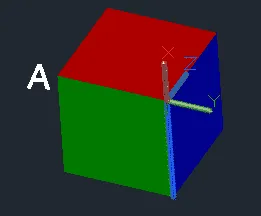
Let’s take an example of the image below.
In this cube, we have XY plane shown in green color, YZ plane shown in red color and XZ plane shown in blue color.
I will use point filters here to make a circle at a point in 3D space taking reference from point A of the cube.
Type C and press enter to start circle command, press and hold the shift key and right click to bring the contextual menu.
Select point filters from this contextual menu and select .YZ from sub-menu which appears.
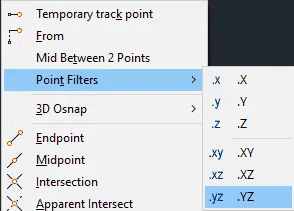
Selecting YZ from point filters menu will tell AutoCAD to use Y and Z coordinates of the point which you are about to select.
Click on the corner of cube indicated as point A.
AutoCAD will pick Y and Z coordinates of point A and you will now see this prompt on the command line which is prompting you to specify X coordinate.
Enter 2 on the command line and press enter, a circle will start at the point with X coordinate as 2 and Y and Z coordinates of point A.
You can now enter the radius of the circle to complete this geometry.
In a similar way, point filters can be used to create geometries taking reference of existing points in the drawing.
Summary
Point filters are a way to select coordinates from your 2D or 3D drawing without having to manually find the coordinate values.
When used properly it can help you make drawings much faster but it will take some gutting used to in the beginning.
If you have questions related to this article let me know in the comment section down below.

