AutoCAD block attributes are powerful tools that add intelligence and dynamic data to your design.
You can think of it like AutoCAD Dynamic blocks.
Dynamic blocks add intelligence to the geometry or shape of the block whereas attributes add intelligence to the text part of the block.
Let’s take the example of an office plan where we have several cubicles, and we want to assign number to each cubicle using a block.
70 lessons| Easy Level
If you are absolute beginner of AutoCAD then you can get started right from scratch using this free course.
In this case if we use a simple text to create a label for the cubicle then that label will stay the same but instead of using normal text, we can use attributes here.
When you use attributes, AutoCAD will allow you to change the value of attribute for every reference of the same block keeping everything else in the block unchanged.
Here is an example of this block attribute in action where a block containing cubicle number is assigned to all cubicles and as you can see the text in every reference of these blocks is different.

So, in this tutorial I will walk you through the simple stages of creating an AutoCAD block containing an attribute.
We will essentially learn to create a block called “Room.ID” where we will add attribute to designate room numbers.
Creating Block Attributes in AutoCAD
First, you have to draw a rectangle using the rectangle command from the “Home” tab, or by typing in the command line “REC” to activate the command.

The dimensions of the rectangle will be 1000mm (length) by 300mm (width).
I am using metric unit for this, but you can follow along using imperial unit as well.
After making the rectangle type "ATTDEF" on the command line, then press Enter on your keyboard.
A new Attribute definition window will open up, we will define the room number attribute here.
Under “Mode,” check on “Lock position” and under “Insertion Point” check the “Specify on-screen” option.
In the “Attribute” panel type “RM_ID” for Tag, In the prompt option type “Insert Room Number” and leave the default box as empty.
Under “Text Setting” panel add the text height to 150mm, justification as left and text style as standard.
Uncheck the annotative option and keep the rotation value to 0 then click OK as shown in the following image.

Now click inside the rectangle we made previously to place the RM_ID text.
This is a text placeholder which will be replaced with actual attribute value once we enter it.
After placing the attribute inside the rectangle this is how it will look like.

Just in case you are wondering here is a description of all the options available in the mode panel of the Attribute definition window.
Invisible: When you check this option the attributes created won’t be visible in the drawing area or on your prints.
You can create invisible attributes to add information like manufacturer of a block.
Using this the information will stay in the drawing and can be checked when needed but it won’t show up directly.
Constant: Assigns attributes a fixed value upon block insertion, suitable for information that remains constant.
It is more like adding a simple text rather than an attribute to a block.
Verify: Checking this option will prompt you to confirm the attribute value when inserting the block.
Preset: When you check this box AutoCAD will set the attribute to a predefined value without displaying a prompt when you insert the block.
Lock Position: Selecting this option will lock the location of the attribute within the block reference.
If the attribute is not locked, then it can be moved relative to the block reference.
Multiple Lines: If an attribute has long line of text then you can select this option to allow the attribute text to go to the next line when it crosses a set boundary length.
You can set this boundary length in the “Boundary width” option of text settings block of Attribute definition window.2. 3.
Making the Attribute into a Block
After placing the attribute inside the rectangle, we will convert the rectangle and attribute text into a block.
Start with the create block command.
You can either type the “B” command in the command line or, from the "INSERT" tab, under “Block Definition,” click on the “Create Block” command.

The following window prompt will be shown.
In the Block definition window add name as “Room.ID”, under Base Point click on pick point option and then select the lower left corner of the rectangle as the base point of the block.
Under Objects panel check on “Select Objects” box then select the rectangle and the attribute text we created in the example so far.
Now select the “Convert to block” radio button and under behavior panel and check the “Allow for exploding” option.
Keep all other options unchecked and then click OK.

After you click on "OK,” an “Edit attributes” window prompt will show up.
This prompt will show the name of the block, prompt of the attribute that we used to create the attribute text and an empty field where we can add our attribute value.

Type the attribute text in the empty field and then click OK.
I am using 1 for the attribute value for our example.
Additionally, if you insert a new reference of this block again it will show the “Edit attribute” window every time and you can add a new value for the attribute.
Modifying and Managing Block Attributes
Block attributes often change or get reassigned.
So, you can keep up with the changes by simply modifying the attribute value of a block.
Double click a block that contains an attribute and it will show “Enhanced Attribute Editor”.
Here you can select the name of attribute from the list of available attributes in the Attribute tab.
Then you can modify the value in the Value field and click OK to accept the changes.
In our example we only have one attribute RM_ID so it can be modified by adding a new value for the attribute text in the Value field as shown in the following image.

Alternatively, you can also use the DDATTE command then click on the block for which you want to modify the attribute values.
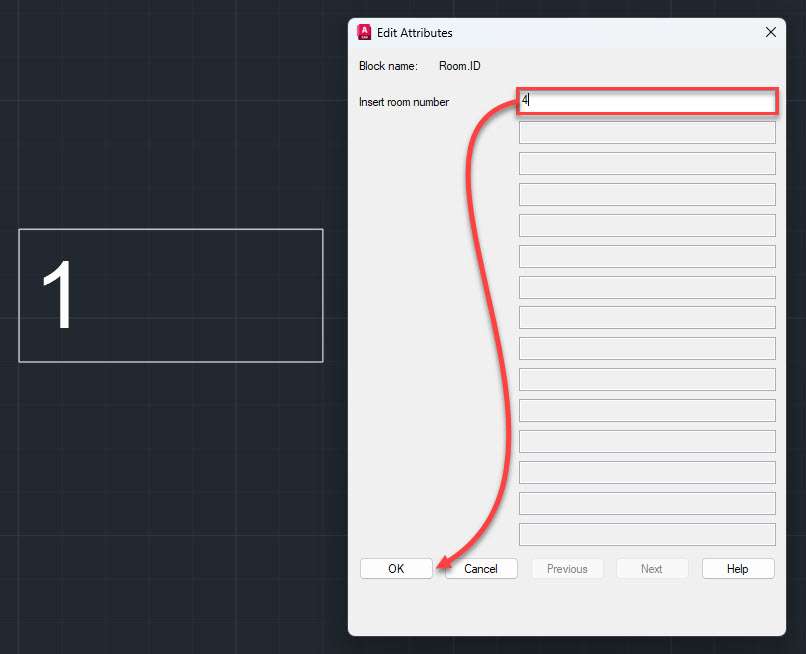
The “Edit Attributes” window will show up again and here you can add new value of the attributes and click OK to accept the changes as shown in the following image.

In the example above I changed the attribute value from 1 to 4.
You can also change the properties of the attribute text like color, height, text style and more using the “Enhanced Attribute Editor”.
To do that double click the block for which you want to modify the attribute text properties and then select the “Text options” tab from the “Enhanced Attribute Editor” window that shows up.
In the “properties” tab you can change properties like layer and color and from the "Text Options" tab you can change text highlight, style, width factor and other similar properties.
I am changing the color of attribute for our example to red and the resulting block with the red attribute will look like the following image.

Making changes using "Enhanced Attribute Editor" affects only the block reference that you are modifying.
If however you want to modify all the references of a block that contains an attribute then your can use Block Attribute Manager for that which is explained next.
Block Attribute Manager
After making a block with attribute if you want to change the properties of its attribute like the Tag name or prompt so that all the references of that block update then you can use Block Attribute Manager.
You can start Block Attribute Manager using the “BATTMAN” command in the command line and pressing the enter key.
Alternatively, under the “Home” tab, and expanded “Block” options, select the block attribute manager as shown in the following image to start the Block Attribute Manager command.

For our example we will modify our “Room.ID” block attribute so that its Room_ID attribute becomes invisible and its color becomes green.
Once the Block Attribute Manager pop-up window is launched, the following items will be visible.

To select the block you want to modify you can click the “Select block” button highlighted as option 1 in the image above or you can select the block from the list as shown in the option 2 of the image.
For our case, I will select the “Room.ID” block from the available list.
After selecting the block all the attributes of the block will show up in the list shown by option 3 of the image above.
If you have multiple attributes, then select the one you want to modify and then click the Edit button as shown in option 5.
A new Edit Attribute window will show up.
Here are the other options of block number 5 of the image shown right above:
The "Sync” option is used to update the changes to all the available instances of the block attribute in the drawing;
“Move Up and Move Down” used to rearrange the order of attributes within the Block Attribute Manager;
"Remove" is used to clean the attribute list in a block by purging those that are unnecessary in the current drawing.
In this window you can change the properties of the attribute like Tag, Prompt, Default value or even change the Mode from the panel under Attribute tab.
You can modify other properties like color, scale, style of text from Text option and Properties tab.
For our example I am changing the mode of our attribute to Invisible by checking the box from the Mode panel and then I will change the color of the attribute to green from the properties panel as shown in the following image.
After making these changes click OK to close Edit Attribute window and then click OK again to close the Block Attribute Manager window.

You will notice that all the references of the attribute in the drawing will update and if you add a new block, it will take these newly defined properties.
Not only that as we set the attribute property to invisible it will essentially hide the attribute from our drawing, and it won’t show up.
To see the hidden attribute, you can click the Display All Attributes option under the expanded blocks panel of the home tab as shown in the following image.

To retain the display of attributes you can select the Retain attribute Display option from the Attribute display dropdown option and the visible attributes will show up and hidden attributes will hide.
If you are wondering why anyone would want to keep the attributes invisible, then here is an example.
Let’s say you want to make a chair block, but you want to keep the name of manufacturer hidden from all users.
70 lessons| Easy Level
If you are absolute beginner of AutoCAD then you can get started right from scratch using this free course.
In that case you can add an invisible attribute with the name of the manufacturer as invisible attribute.
Anyone who has the actual drawing file can see the manufacturer using the attribute display option shown above.
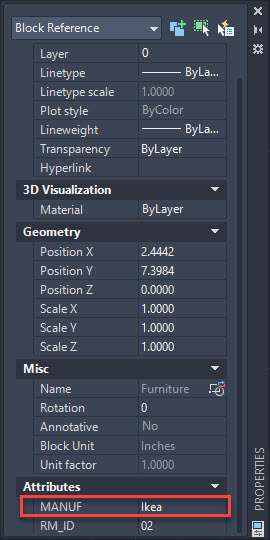
Alternatively you can select the block and right click and select the properties option.
On this properties palette the hidden attribute is shown along with all the other attributes as shown in the following image.

Frequently asked question
So, now you know about making and modifying blocks attributes in AutoCAD, let's answer some of the questions that you might have.
How do you explode block attributes in AutoCAD?
You can explode the block containing attribute using “burst” command in Express Tools > Blocks > Explode Attributes To Text or use the BURST.
Although this process converts attribute inserts within the block into regular AutoCAD entities, it also removes attribute intelligence and may result in a loss of formatting.
If you use explode command (command alias X) then also the block containing attribute will explode but this time the attribute text value is not retained and it will go back to the tag assigned to it.
Here is an image showing the difference between BURST and EXPLODE commands on a block containing attribute.

How do I change multiple block attributes in AutoCAD?
Using the Block Attribute Manager (BATTMAN) allows you to change attribute values across multiple blocks.
It provides a centralized interface for managing attributes, making it easier to update information throughout the drawing.
Please note that the steps may vary slightly based on the AutoCAD version you are using.
Always ensure you have a backup of your drawing before making extensive changes to attributes.
Summary
So, that was all about making, inserting, and modifying block attributes in AutoCAD.
Before I wrap up, here is a tip.
Wherever possible you should adopt a clear naming convention, such as "RM_ID" for room identification, to enhance organization and comprehension of data in your drawing.
I hope this article helped you learn to work with block attributes in AutoCAD.
Let me know in the comments below if you have questions.


