Over the years I have collected several AutoCAD tips that I am now sharing with you here.
These are tips, shortcuts and some workarounds that you can use to make your AutoCAD workflow super productive.
So, let's begin with the simple tips first.
Basic Tips
These are some of the basic tips that every AutoCAD user should know.
Shift key override
When working in ortho mode your cursor will move in either vertical or horizontal direction.
To move it in any direction you can use polar tracking.
But if you want to work in ortho mode and only want to temporarily activate polar tracking then press and hold SHIFT key.
Now as long as your shift key is pressed the ortho mode will work like polar tracking and the opposite of this is also true.
You can also use shift key to remove objects from selection set.
So, if you have several objects selected and you want to remove any specific object from the set then press and hold shift key and then click on the object you want to remove from the selection.
Deactivating lasso selection
When you press and hold your mouse left click and then move it in the drawing area you get what we call a lasso selection.
This is a freehand kind of selection like the image down below.
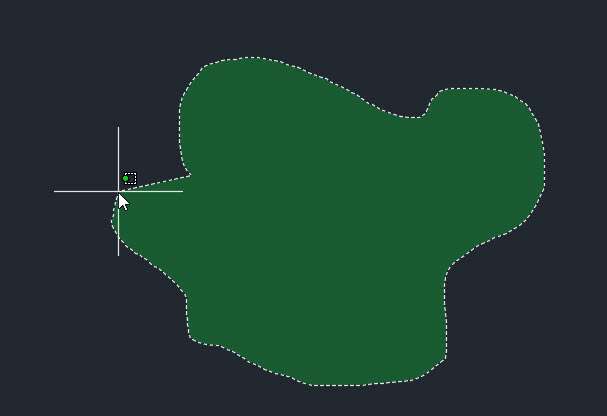
If you don't like this selection method then you can deactivate it completely.
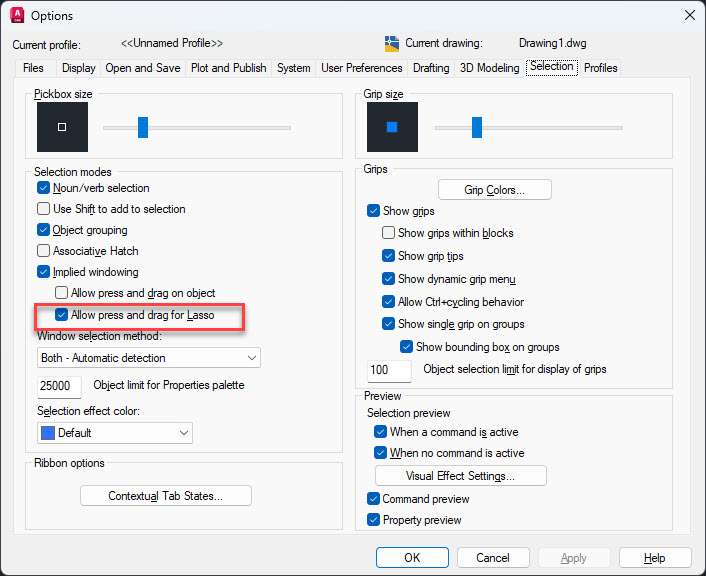
To deactivate it type OP and press enter then go to "Selection" tab and deactivate the option "Allow press and drag for Lasso" as shown in the following image.
This will deactivate lasso selection and now you will have a regular window selection instead.
Selecting one vs several objects
When selecting multiple objects in AutoCAD you don't need to press and hold the shift key like other windows tools.
But if for some reason selecting one object is deselecting the other object from your drawing then you can fix it using PICKADD system variable.
Type PICKADD on the command line and then press enter.
70 lessons| Easy Level
If you are absolute beginner of AutoCAD then you can get started right from scratch using this free course.
Type 2 in the next prompt and press enter and now your selection will return to normal.
If you want to select only one object at a time then change the PICKADD system variable value to 0.
Repeat command without pressing enter
If you want to use a command multiple times and don’t want to press enter key again and again then you can use MULTIPLE command to keep command running in an infinite loop.
Type MULTIPLE on the command line, press Enter key and then enter the name of the command which you want to repeat.
As an example type C for circle and press enter, now make a circle.
Once your circle is completed AutoCAD will not exit circle command and it will be ready for making another circle.
To exit this loop press ESC key.
Select between two points
To select a point exactly at the midpoint of two object you don’t need to make a reference line rather you can do it directly using the object snap option.
As an example, in the following image lest assume we want to start another line that is exactly at the mid-point of a line connecting points A and B.
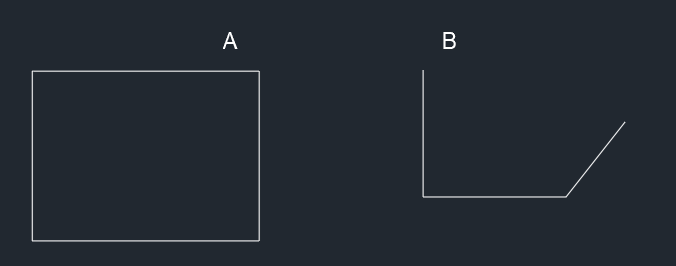
For that I will start with the line command and then press and hold the shift key and then right click.
From the context menu that shows up select “Mid between two points” as shown in the following image.
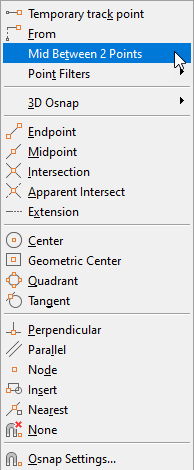
Now click on point A and then point B and now the line will start exactly at the mid-point of line connecting A and B.
Select similar option
This is a great time saving tip that will help you select multiple objects sharing the same properties.
As an example, let’s say we have a drawing with several blocks, dimensions and other objects and we want to select all the door blocks from the drawing.
For that select any door block and then right click and select the option “Select similar” from the contextual menu as shown in the following image.
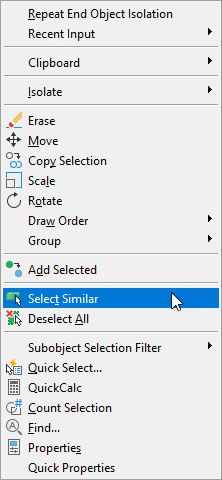
This will select all the door blocks from your drawing.
You can repeat the same process for selecting objects like dimensions and other drawing entities.
Toggle selection set
When you have an active lasso selection where you select objects by clicking and holding the left click and then dragging the mouse you can toggle between different selection modes.
So, click and hold the left click then move the mouse to make a lasso freehand selection then press spacebar key and the selection set will change to window, crossing and fence type as shown in the following animated GIF.

Beyond the Basics
These are the tips that are little advance for a complete beginner but if you know a little bit about AutoCAD then you should start using these tips as well.
Filleting parallel lines
In AutoCAD you can add fillet between parallel lines and it will automatically add a semicircular cap like the animated gif shown below.
You can use any radius value for making fillets between parallel lines.

Using ZERO radius fillet
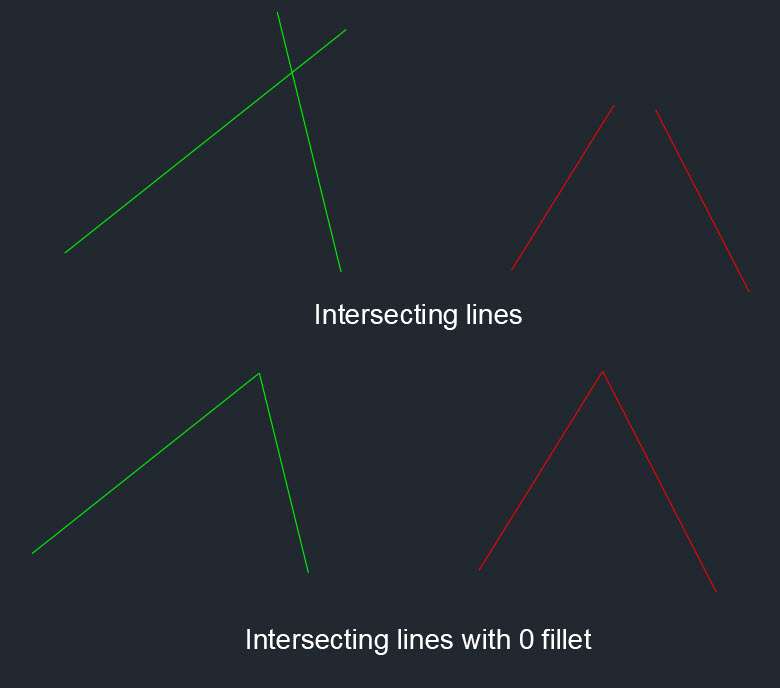
If you want to merge two intersecting lines at one sharp point then use a fillet of 0 radius.
You can also use chamfer of 0 length to add sharp corner at the point of intersection of the lines as shown in the following image.
Command search feature
If you know the function of a command but don't know it's exact name, alias or location then you can use this next tip to find it.
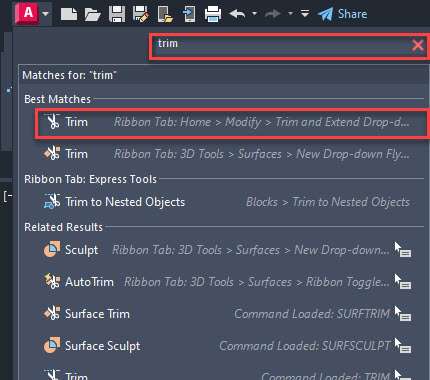
Click the application button (the AutoCAD logo) on the top left corner of the screen and then type the thing that command can do in the search field.
As an example, let's assume I don't know the location of trim command.
So, I will type trim in the search filed and I will get the trim and similar commands in the results as shown in the following image.
Bring all annotations to front
This command can save you lot of time by allowing you to bring all annotations on top of other overlapping drawing objects with a single command.
To bring all annotations like text, dimensions and leader lines to the front of every other drawing object type TEXTTOFRONT on command line press enter then select All from options.
Linear array using copy command
With the Array feature of the copy command, you can easily make a linear array in AutoCAD without using the rectangular array tool.
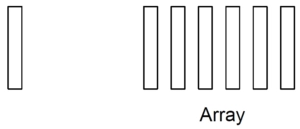
To explain this feature I will use the geometry shown in the image below.
Here we want to make an array of a vertical rectangle so that it finally looks like the image on the right side with six rectangles in a row with the gap of 2 units among each of them.
Type CO on the command line and press enter to start the copy command then select rectangle and press enter again.
Now specify any point on the rectangle as the base point, for this case I am clicking at lower left corner of the rectangle.
70 lessons| Easy Level
If you are absolute beginner of AutoCAD then you can get started right from scratch using this free course.
Now look at the command line, it prompts you to select the second point or select the Array option.
Select Array option from the command line, now it will prompt you to specify the number of items in the array.
Type 6 on the command line and press enter.
Command line will now prompt you to select the second point for the array or select the Fit option.
Click at the second point in the drawing area to specify the gap between two corresponding array elements.
You can also enter the distance between the two elements on the command line, for our current example, I will enter a distance of 2 units and press enter.
You will see that an array will be created with six rectangles all spaced at the distance specified by you.
If you select the Fit option from the previous prompt then specifying a distance will fit all objects within that space.
For example, if you select Fit and then type 10 on the command line and press enter then all six rectangles will be fitted in between a length of 10 units.
Copy and paste as block
You can copy an object from one drawing and paste it in another as a block.
To copy an object select it from the drawing area and then press CTRL + C on your keyboard to copy it to the clipboard.
Then go to the target drawing (or same drawing if you want) and press CTRL + Shift + V and this will paste your copied object as a block with random name.
You can rename the block using the RENAME command.
Align text along one column
If you have several lines of text that are not aligned properly then you can use TEXTALIGN command to align them with respect to a selected text along a single column.
To align the text type TEXTALIGN command and press enter key.
Now select all the lines of text you want to align, and press enter key again.
Now select the text you want to use as reference to align all the remaining lines of text.
Then move your mouse along the vertical direction to align it as shown in the following animated image.

Advance tips
These are the advance tips for a seasoned AutoCAD user and you should definitely use them to become a pro user.
Toggle object between model space and paper space
If you want to move an object to and from model space to paper space then this command is for you.
This command can only be activated in layout view and it automatically adjusts scale of the object to the scale of target space (model space or paper space).
Open layout view and double click inside your viewport to activate model view.
Now type CHSPACE on the command line and press enter, select object(s) that you want to move to paper space and press enter again.
Your selected objects are now in paper space.
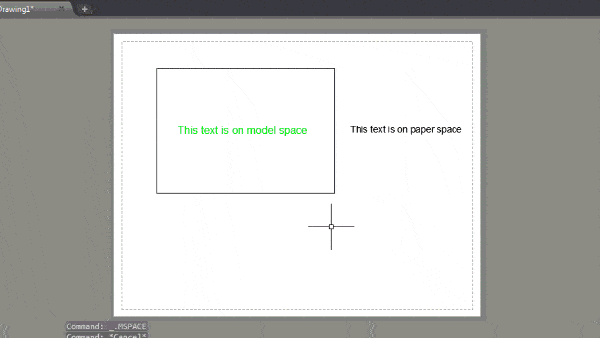
Similarly to move the object in paper space to model space double click outside viewport to activate paper space then activate command CHSPACE and select object on paper space then press enter.
Your objects will move to model space and the scale of the object will also be maintained.
Searching named AutoCAD objects
Using Design Center of AutoCAD you can search for a named object like layer, block or dimension style directly without having to look for the drawing that contains these named objects.
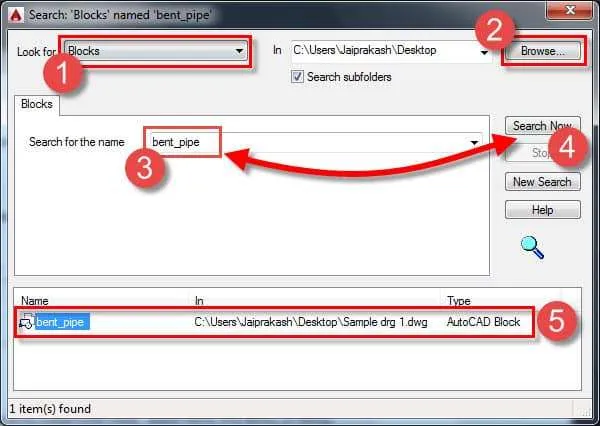
let’s take an example where we need to find a block named bent_pipe but we don’t know the drawing which has this block.
For that type CTRL+2 on keyboard and press enter alternatively you can also use it's command alias ADC.
When design center palette opens up, click on search icon on top of the design center palette as shown in the image below.

In the search window on the top left side, you will see “Look for” drop-down menu.
Select component of drawing which you want to search.
In this case, we want to search for bent_pipe block so select blocks from the drop down menu.
Now browse to the folder or local/network drive where you believe drawing containing block under consideration is placed.
70 lessons| Easy Level
If you are absolute beginner of AutoCAD then you can get started right from scratch using this free course.
Try to be as specific as possible in selecting the drive or folder to speed up the search.
The time taken by this search to return the results will directly depend upon the number of drawing in the folder.
More drawing in a folder will force it to crawl more resulting in delays.
Click on search subfolders radio button also if you believe that drawing could be in any of the subfolders of the designated drive or folder.
Type name of the object in the Search field.
In this case, we will enter bent_pipe as the name of the block and click on Search Now button.
Your result will appear on the lower panel of search window with the path of drawing as shown in the image below.
You can also use popular wildcard characters in the search field of the design center.
You can directly use this block by double-clicking on it or by selecting Insert Block from right-click contextual menu.
Custom dimension arrow style
Apart from regular arrow styles of dimension style manager you can create your own arrow style as well.
If you want to add a custom dimension arrow style like the one shown below then here are the steps.
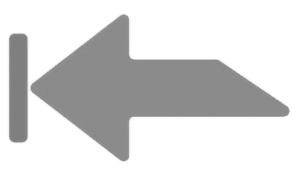
Make a custom arrow style using simple draw commands and convert it into simple AutoCAD block.
AutoCAD uses the blocks as arrow symbol, so I will name this block "Custom arrow".
Don't create a dynamic block from arrow style as it won't work.
Now type D on the command line and select dimension style which you want to change then click on modify button.
Select symbols and arrows tab from next window and click on arrow drop down menu from arrowheads panel and select "User Arrow" from the menu as shown in the image below.
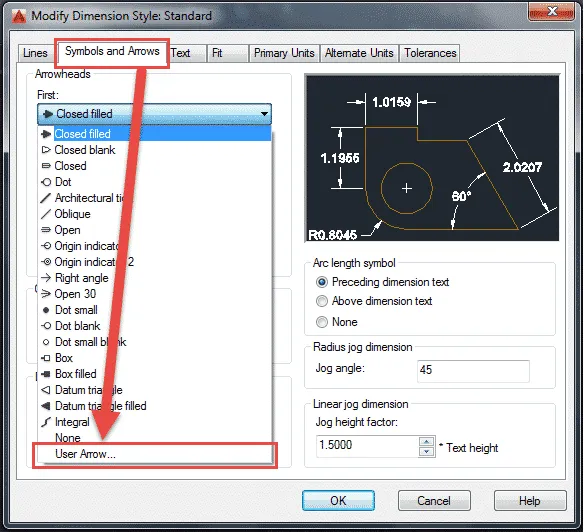
Now a small window called Select custom arrow block will pop up with a list containing all drawing blocks.
Select "Custom Arrow" from the list and click on OK and close all open windows by clicking OK or close.
Now start any dimension command and pick two points for making that dimension.
You will notice that the dimensions will now be made with custom arrow style.
To modify this custom arrow style simply modify the block and the arrow style will be modified everywhere in your drawing.
Use temporary object snap tracking point
If you want to draw something or move an object with respect to another point, then you can use temporary object snap tracking to track its distance along two separate axes.
As an example, in the following drawing, we want to move the red door at point B with respect to point A where the distance of point B along X axis is 5 units and along Y axis is & units.
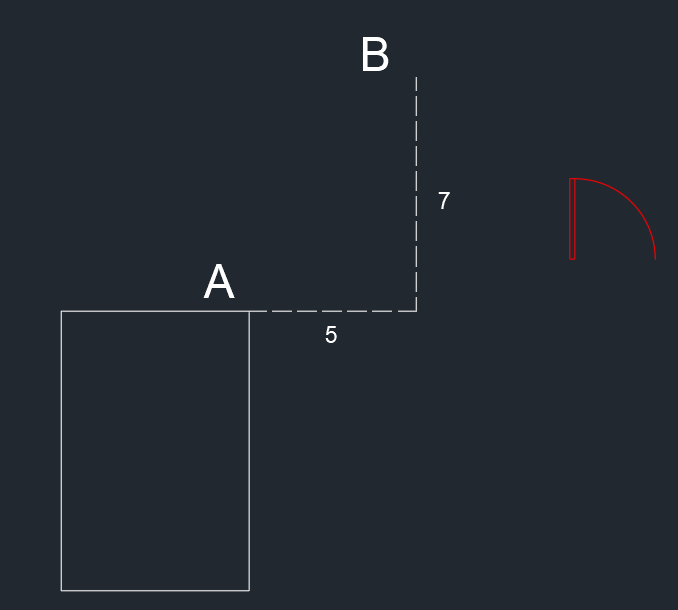
To do that start with MOVE command and then select the red door and press enter key.
Now select the lower left corner of the door block and move to point A but don’t click yet just start tracking it to the right side then type TT and press enter key.
Now type 5 press enter then track up then type 7 and press enter key again as shown in the following animated GIF.

Now the object has moved to the point where it should be.
Tips for power users
These tips are for power users who are using AutoCAD for decades, if you are not using these tips you should consider using them.
Searching named objects from the command line
You can search named objects like blocks, layers or dimension styles directly from your command line and you can activate them too from the command line.
For turning on search feature type INPUTSEARCHOPTIONS on the command line and press enter.
Now make sure “search content at command line” radio button is turned on.
Also turn on radio buttons of named objects from content type panel, for best results I recommend turning on all radio buttons from content type panel as shown in the following image.
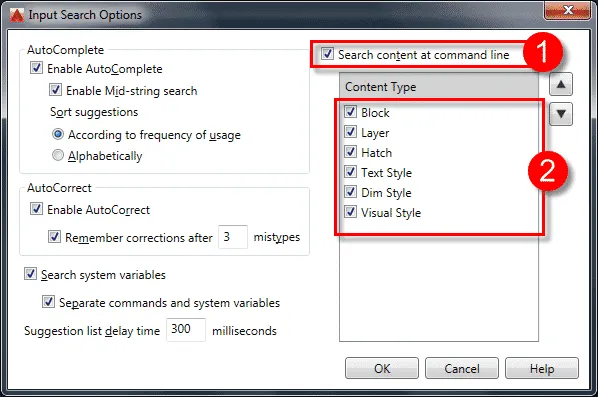
Once you are done click OK to close the window.
Now type the name of any named object on the command line and it will appear among the results, click on the name of the object to activate or make it current.
Clean up drawing area
If you want maximum working area from AutoCAD you can turn off the ribbon and other clutter from your AutoCAD window by pressing CTRL + 0 on the keyboard.
You can also hide command line by pressing CTRL+9 to get maximum space.
To bring back ribbons press CTRL + 0 again and for command line press CTRL + 9 again.
Calculation directly on the command line
You can enter expressions on the command line to make calculations directly to find dimensions of geometry and you don’t need to open calculator separately for making tedious calculations every time.
As an example, I will make a circle with radius equal to 2/3*radius of another arc from geometry.
Start circle command then type ‘CAL on the command line and press enter (make sure you add an apostrophe before CAL).
Your command line will now show following prompt.
Enter an expression 2/3*rad and press enter then click on arc or circle from geometry to pick the value of rad for expression mentioned above.
Your circle will be created with the radius equal to 2/3 multiplied by the radius of arc or circle you selected from drawing.
Suppose radius of selected circle or arc is 6 units then the final circle will have a radius of 4 units which is equal to 2/3 X 6.
You can also enter simple expressions like 3*pi or 4/3*5 which does not contain any variable.
Migrate customizations using profile
You can use profiles to migrate your AutoCAD user interface customizations and settings.
Type OP and press enter then click the export button on profiles tab as shown in the following image.
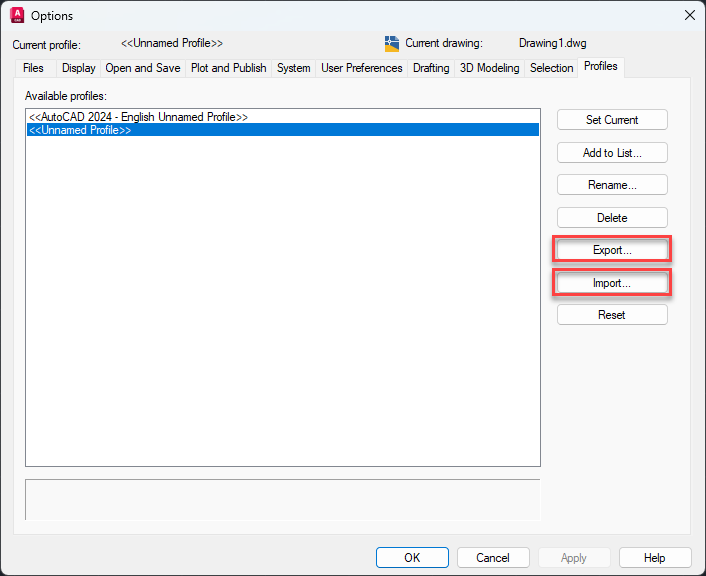
Now specify the location and give this profile a name.
It will be saved as an ARG file.
To import the same settings on another AutoCAD installation, copy paste this file on the PC containing your new AutoCAD software.
Type OP press enter then go to profiles tab and then select "Import" button as shown in the image above.
Locate the ARG file you saved in previous step and open it and the profile will load.
Set this profile as current using the "Set current" button on the profile tab of options window and you have your same settings migrated to new AutoCAD.
70 lessons| Easy Level
If you are absolute beginner of AutoCAD then you can get started right from scratch using this free course.
Add folder shortcut in Open window
When you use a location quite often you can pin it in the open window to access it quickly without having to go through entire folder list.
You can crate this shortcut not only for local folders but also for folders stored on network drive and even on cloud account like Google Drive.
As an example, let’s assume I reference a folder called “Jaiprakash pandey” quite often from my Google Drive.
So, I will open the “Open window” using CTRL + O keyboard shortcut and then I will browse to the “Jaipraksh Pandey” folder.
Then click the “Tools” dropdown and then select “Add Current Folder to Places” option as shown in the following image.
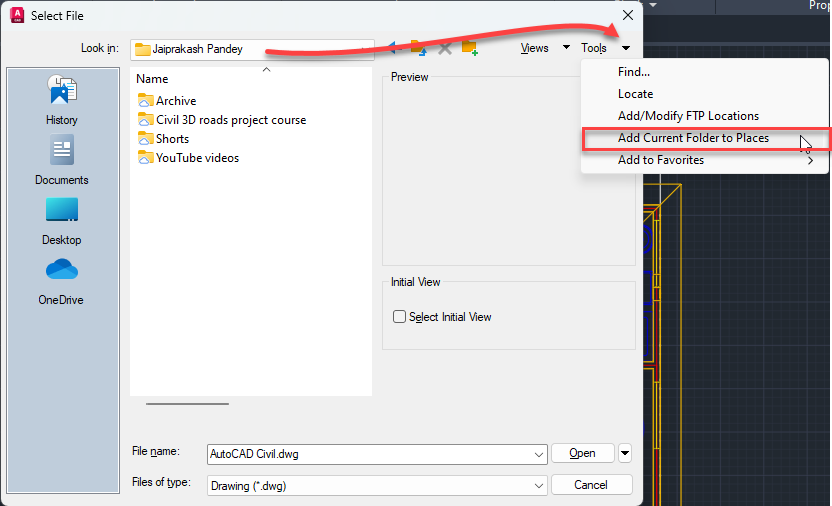
The folder will be added to the open window as shown in the following image.
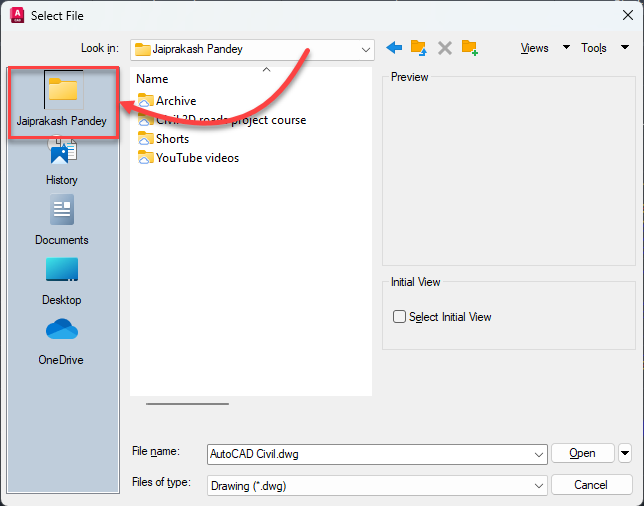
Exit the Open window and then click save changes when the prompt to save changes in the “Places folder” pops up.
Batch convert AutoCAD file version
If you have several AutoCAD DWG files and you want to convert their version to an older one like 2013 then you can do it in a batch using ETRANSMIT command.
For that open a blank drawing and save it anywhere you like and then type ETRANSMIT and press enter key.
Now select the file button and add all the files you want to convert to an older version and then click the “Transmittal Setups…” button as shown in the following image.
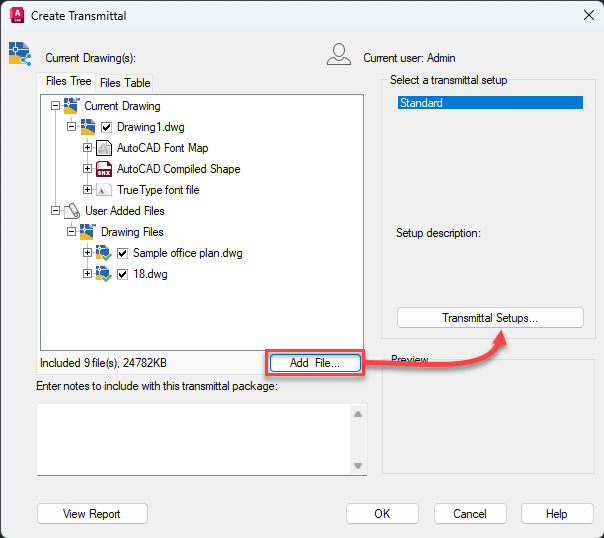
Now click “Modify” in the next window and then select the version you want your drawings to convert to from the “file format” dropdown as shown in the following image.
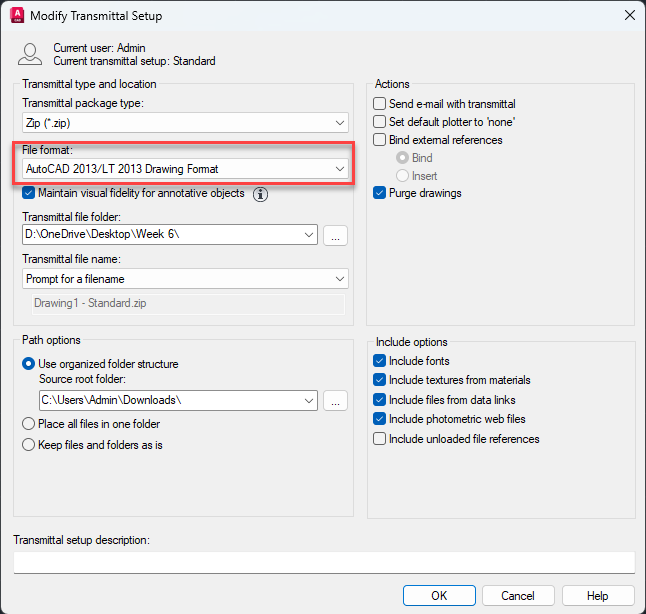
In the “Transmittal package type” option which is just above the “File format” option select “Folder” and this will ensure all your files are exported in a simple folder.
Click OK to accept the changes and your files are now converted into older version and they are all placed in a folder that you specify in “Transmittal file folder” option of “Modify Transmittal Setup’ window.
Adding classic workspace in AutoCAD
This is a tip which is favourite of veteran AutoCAD users who simply don't want to let go of the classic AutoCAD interface.
You can get it back in any AutoCAD software provided you have access to older AutoCAD installation as it needs CUI file which you can create using older AutoCAD software only.
More about this tip is explained in this article: Restore classic workspace in AutoCAD.
Summary
This is a dynamic list where I keep adding more tips whenever I find something that triggers the "Aha' moment.
If you want to share your AutoCAD tips then let me know in the comments down below and I will add it to the list.
Also, if you want to test your AutoCAD skill then check it in this AutoCAD quiz.

