In this article, I will show you the step by step method of making parametric drawing in AutoCAD and working with geometrical or dimensional constraints or dependencies.
Parametric drawings update automatically if any parameter is changed, this also helps in maintaining design intent.
The parametric drawing is made with the help of geometrical and dimensional constraints.
These constraints build a relation between different parts of the drawing in such a way that if one part changes the other one updates automatically based in constraints applied to them.
This feature of parametric drawing was introduced in 2010 version of AutoCAD and we have covered it in detail in our Customization and cloud tools of AutoCAD course.
So, let’s start with applying constraints in a simple drawing.
Applying Constraints
Make a rectangle with any dimensions and a circle at the geometric center of the rectangle.
Now go to the Parametric tab and select the linear option from the Dimensional panel.
Click at the top left vertex of the rectangle and then click at the top right vertex and place the linear constraint.
Similarly, apply the linear constraint on any one vertical side of the rectangle.

Now we will apply dimensional constraints from the Dimensional Panel.
The dimensional constraint is different from the simple dimensioning and should not be confused with dimensions.
Select Diameter constraint from Dimensional panel and apply it to the circle at the geometric center of the rectangle.
Now apply the linear constraint to the circle with respect to the horizontal and vertical side of the rectangle.
70 lessons| Easy Level
If you are absolute beginner of AutoCAD then you can get started right from scratch using this free course.
Now select Fix constraint from the Geometric panel and click at two diagonally opposite vertices of the rectangle to make it fixed.
Now select Perpendicular constraint and apply it on three vertices of the rectangle.
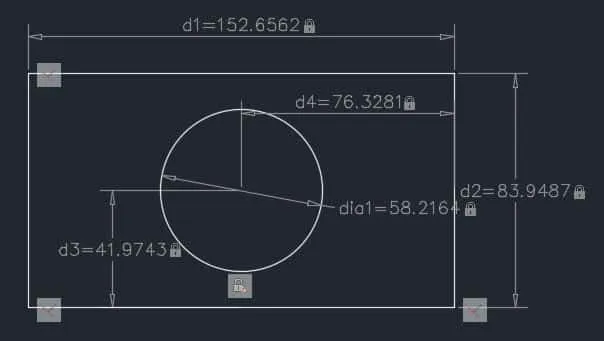
The geometry is now fully constrained as shown in the image below.
Making simple formulas
Let’s assume that we want the geometry made above to behave in such a way that diameter of the circle always remains half of length of the rectangle.
For that, we can create a simple relation or formula and apply it to the respective geometries in the drawing.
Click on Parameters Manager icon on Manage panel of Parameters tab or use it's command equivalent PARAMETERS.
Click on the *fx icon on the top left corner of Parameters Manager palette.
A new list User Parameters will be added to the palette.
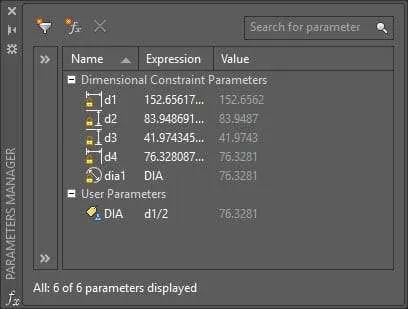
Double click on the user1 parameter and change it's name to DIA.
Double click again on expression column next to DIA and type d1/2 which mean DIA parameter will be equal to d1/2 where d1 is the length of the Rectangle.
You can now use this formula to define the diameter of the circle.
Double click on Expression column of dia1 row in parameters manager palette and change it to DIA as shown in the image above.
The circle will update according to changed dimension and diameter of circle will become equal to value of DIA which is half of length of rectangle.
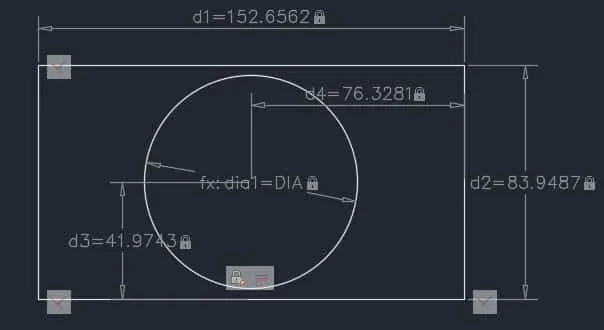
To test this formula go to d1 in drawing area and change its value.
You will notice that diameter of the circle will also change accordingly not only in parameters manager palette but also in the drawing area.
Making nested formulas
In the above example, I have used a simple formula but you can also use nested and complex formulas that involve the use of sine, cosine and logarithmic expressions.
I will use the same example of rectangle and circle to explain this as well.
Suppose we want to change the length of the rectangle (d1) in such a way that it always remains five units less than twice of the width of the Rectangle (d2) then we can use this expression (d2*2)-5 to define the length of the rectangle where d2 is the width of the Rectangle.
To apply this formula click on the *fx icon and double click on user2 and rename it to EXP.
Again double click on the expression box next to EXP and write the expression (d2*2)-5.
Now write EXP in d1 row expression column as shown in the image below.
You will notice that length of rectangle changes to reflect dimension according to formula.
Final settings in parameters manager will look like this.
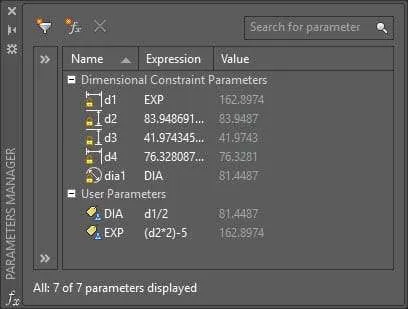
You can test this nested expression by changing the value of d2 which will change dimensions of all dependent geometries including the diameter of the circle.
70 lessons| Easy Level
If you are absolute beginner of AutoCAD then you can get started right from scratch using this free course.
Summary
This was just one example where parametric tool was used to create intelligent 2D drawing.
You can use it to make similar parametric drawing with even more complexity but I won't recommend overdoing it as it may create unexpected results.
If you have questions related to this article let me know in the comment section down below.

