How to Open Civil 3D Drawings in AutoCAD
How do you open your Civil 3D drawing in AutoCAD without losing the data or information that was saved? This is a common issue that we usually encounter in…
How do you open your Civil 3D drawing in AutoCAD without losing the data or information that was saved?
This is a common issue that we usually encounter in the field as engineers, surveyors and design team, and in this comprehensive article, I will show you have to achieve this in a step by step way.
Just in case you are interested here is a detailed walkthrough video version of this article.
Changing Civil 3D Drawing Format to AutoCAD DWG
The first test would be to open the Civil 3D drawing directly in AutoCAD without changing any settings or exporting it in a specific file format.
If you do this, you will come to realize that the majority of the Civil 3D data in the drawing is unusable or even missing.
Even if the drawing file in Civil 3D is a DWG or a DXF file, Civil 3D drawings usually come loaded with data, objects and styles that AutoCAD doesn’t natively recognize these complex objects.
To resolve this, the first step before exporting the drawing to AutoCAD would be to convert the Civil 3D drawings into a format compatible with AutoCAD.
This is done by navigating to the Civil 3D application button icon, selecting Export, and then choosing the Export Civil 3D Drawing option to export the Civil 3D drawing as an AutoCAD DWG file, as shown in the exhibit below:
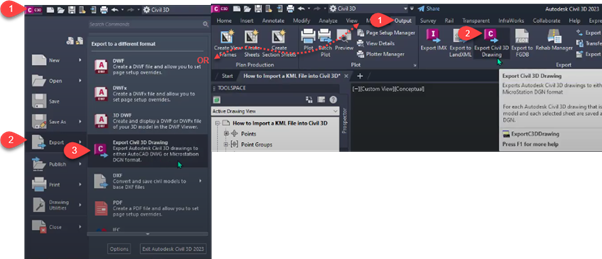
Alternatively, to achieve the same results, navigate to the Output tab and under the Export panel, select Export Civil 3D Drawing as shown in the exhibit above:
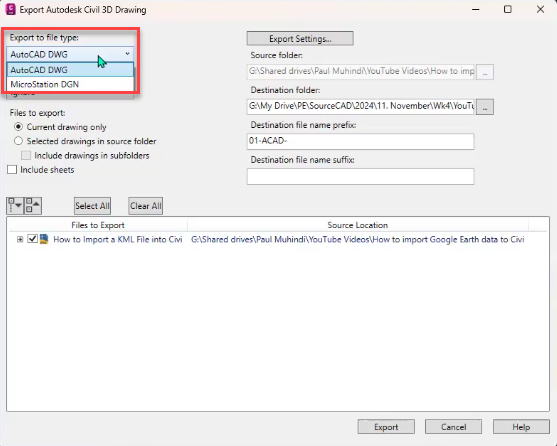
In the Export Autodesk Civil 3D Drawing floating window, input the Export to file type as AutoCAD DWG as shown in the exhibit below.
If your drawing is linked to other files, such as maps, that add additional information to the main Civil 3D drawing, you can bind them into your drawing under External DWG references as shown in the exhibit below.
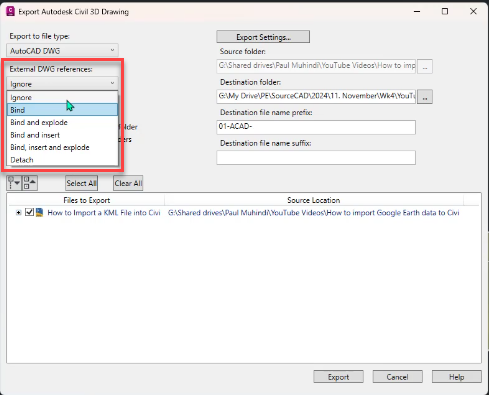
Note: Binding XREFS converts them to DWG drawing files, making them accessible in your AutoCAD drawing once exported.
But if you do not have any external references attached to your drawing, just select Ignore.
Moreover, if you have multiple drawings open in your Civil 3D software, you have the option to export only the current drawing or select drawings from the source folder.
This allows you to specify which drawing you want to export, as shown in the exhibit below.
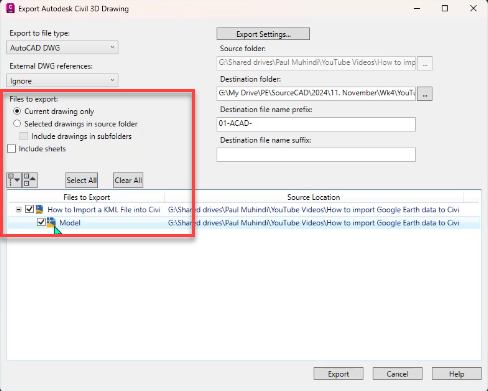
Note: If you have only one drawing open in Civil 3D, select the Current drawing only as shown above.
The best thing about the Exporting option is that it allows you to export the layouts in Civil 3D to AutoCAD.
This is possible by checking the Include Sheets option shown in the exhibit above.
Configuring the Export Settings
When it comes to design work, some teams or consultants working on the same project might be using the same software (in this case, AutoCAD) but different versions.
This can be quite a challenge for users working with the older AutoCAD versions to open files saved in the modern and latest file version.
To resolve this issue, Civil 3D facilitates the possibility of exporting the AutoCAD file type in a lower version to meet any needs, as shown in the exhibit below:
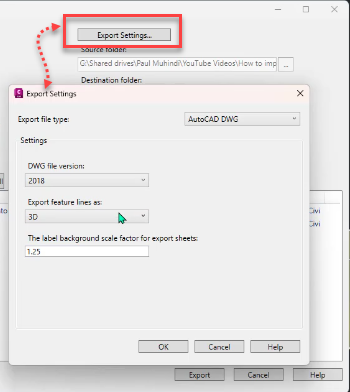
Furthermore, you can specify how the feature lines in the Civil 3D document will be exported to AutoCAD.
You can set it to 3D as shown in the exhibit above to have the Z values in your AutoCAD file.
Plus, you can set the label background scale factor for export sheets to the value you prefer before exporting; you can leave it as a value of “1” to have no change to the scale.
Once you are done with those settings, confirm your source folder, destination folder and destination folder suffix and prefix as shown in the exhibit below.
Note: The Source folder will be automatically captured from where the AutoCAD file has been saved, while the destination folder will be automatically captured from where you have selected to save the output AutoCAD file.
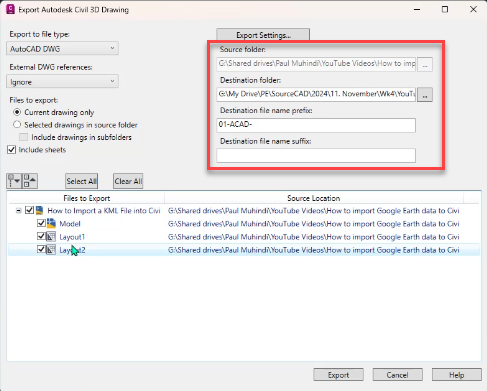
Once done, click on Export.
Opening the Civil 3D Drawing in AutoCAD
Once completely done exporting from Civil 3D, it is time to launch your AutoCAD software and open the drawing.
Navigate to where you had saved your drawing, click on open drawing or drag the drawing and drop it onto your workspace.
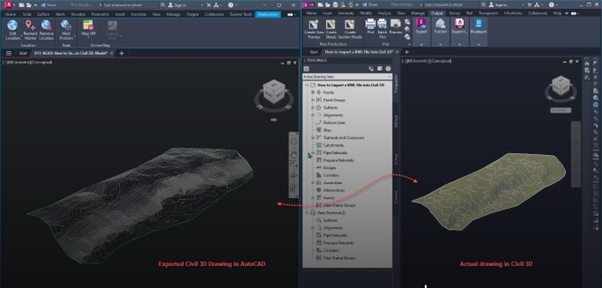
You will notice that the export has now worked, and you can now view all your Civil 3D objects in AutoCAD, as compared to before, where you were not in a position to see the objects in AutoCAD.
Creating a Block from the Surface in AutoCAD
You can now take the process further in AutoCAD by using blocks to maintain consistency in a project drawing.
In this case, you can create a block for the surface to make it into one entity to ensure that the surface maintains its contour lines and elevation points.
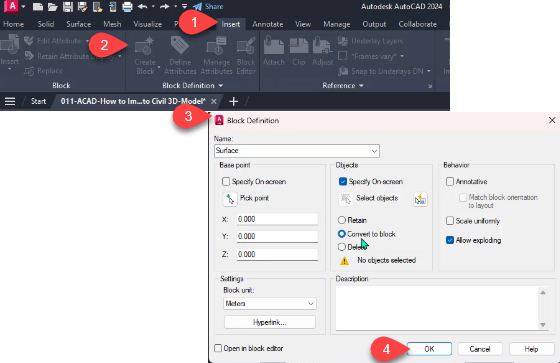
To make a block in AutoCAD, navigate to the Insert tab and under the Block Definition panel, select Create Block.
In the Block Definition floating window, you can specify the name of your block, such as “Surface.”
You can enable Specify On Screen and choose under the Retain option to convert the surface to a block without deleting it.
Additionally, you can allow the exploding of the block reference and click on OK.
This will facilitate you to apply the block created to multiple projects in AutoCAD. Once satisfied, click on Okay, and it will be saved.
Frequently Asked Questions
Here are some of the questions our students ask quite frequently.
Should I bind or attach external references to my drawing?
You can do either.
To incorporate the XREFs into your drawing, it is better to bind.
This option is available for you under the External DWG references as shown in the exhibit below.
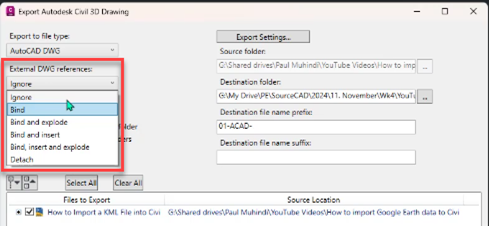
The options that you are working with are as shown above.
Ignore omits all Xrefs from your exported drawing, resulting in a standalone file without any externally referenced content, which can be useful when you only need the base drawing geometry.
Bind integrates the XREF geometry directly into the exported drawing as one block, which makes the drawing self-contained but can increase file size and make individual XREF elements harder to modify later.
Bind and explode goes a step further by breaking down your bound XREF block into individual AutoCAD objects, making editing simpler but potentially losing your original XREF’s layer structure and block definitions.
Bind and insert also integrates your XREF as a block but retains its original insertion point, which can come in handy if you want to maintain the spatial relationships.
Bind, insert, and explode combines the benefits of insertion with the exploded outcome, offering editable geometry at the correct location for your AutoCAD drawing.
Finally, Detach removes your Xref links, but unlike “Ignore,” (discussed above in the first option).
It retains your currently displayed geometry of the XREFs in the exported drawing as standard AutoCAD objects, which can be useful for preserving the visual representation without the external file dependency.
Depending on the collaboration needs and project requirements, you will make the final decision on which option to apply to your AutoCAD export drawing from Civil 3D.
Is it possible to open a Civil 3D file directly in AutoCAD?
Yes, you can, although most of the Civil 3D elements, such as the contours and elevations, will not display accurately.
To resolve this problem, follow the above guidelines to retain all the details.
What if my Civil 3D file is too heavy to export to AutoCAD?
Freeze the unnecessary layers, or, under the Manage tab, in the Styles panel, select Purge to remove unnecessary styles from your drawing.
This will make your drawing lighter and easier to open in AutoCAD.
Summary
By using the Civil 3D exporting features, you can now have all the details captured in Civil 3D to be represented in your AutoCAD drawing without losing any information.
This will come in handy, especially when working with cross-disciplinary teams that rely on different software to achieve their project output, like Civil 3D for surveying works, and AutoCAD for drafting and modelling.
For any comments or clarifications, kindly drop them in the comment section below.