Convert 2D AutoCAD DWG into a 3D Revit Drawing
Transforming your 2D AutoCAD drawing into a 3D Revit model is crucial in modern architectural and engineering workflows. With Revit’s powerful modeling…
Transforming your 2D AutoCAD drawing into a 3D Revit model is crucial in modern architectural and engineering workflows.
With Revit’s powerful modeling capabilities and AutoCAD’s detailed drafting tools, this conversion ensures efficiency, precision, and an easier transition into Building Information Modeling (BIM) and continuity of your design using different software without losing any data.
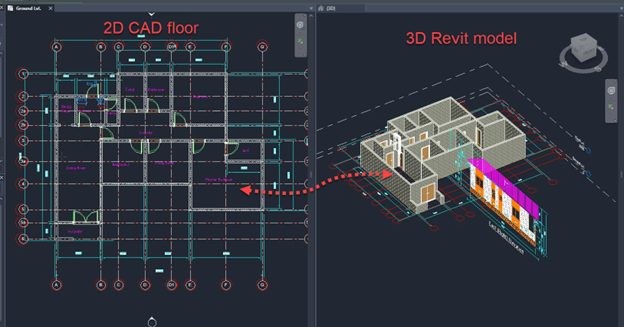
So, in this article I will show you the step by step method of converting 2D AutoCAD drawing into 3D Revit drawing.
Just in case you prefer videos, here is a video version of the article:
Preparing the AutoCAD Drawing for Import in Revit
Before bringing your 2D AutoCAD drawing into Revit, it is important to clean up and optimize the file to avoid unnecessary complications.
You start by opening your DWG file in AutoCAD and checking for inconsistencies in either scale, layers, and/or redundant elements.
Even better, if your file is in PDF format, you can use AutoCAD’s PDF IMPORT command, as shown below, to first convert PDF into a DWG, ensuring all your layers remain intact.
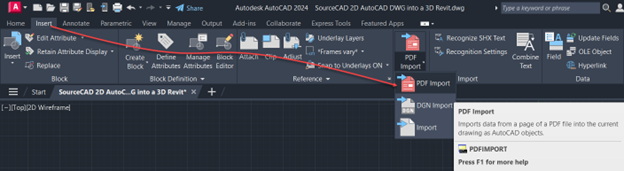
But here we will be focusing only on converting DWG file to Revit so, in this case, leave the options of Import PDF as shown in the exhibit below and click on OK.
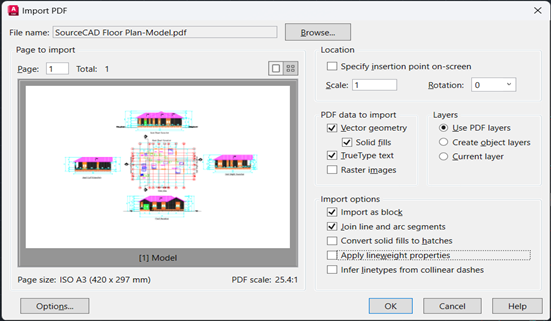
After that, you’ll want to check the scale of your drawing.
To do that, use the DIST command to measure a known length and, if necessary, rescale the drawing using the SCALE command and the Reference option to equate the displayed dimensions from the PDF into the AutoCAD drawing.
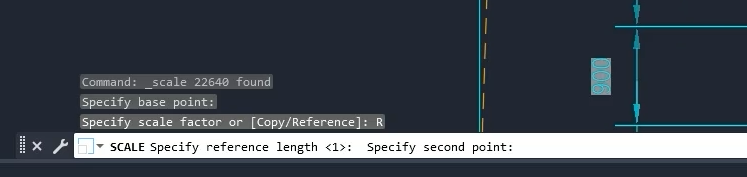
You can now clean up your 2D CAD drawing by removing unnecessary elements, e.g., blocks and some lines, using the LAYERS panel.
You can simply select the unnecessary elements or layers and erase them using the DEL command.
Finally, you can optimize your file by using the OVERKILL command to get rid of duplicate lines.
After that, you can use PURGE to remove any elements you no longer need.

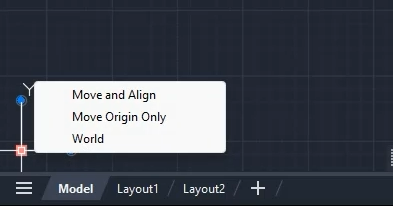
Finally, you can now reposition your drawing closer to the origin using the UCS icon, usually located at the bottom left as shown in the exhibit below, then save your drawing and close it.
Importing the AutoCAD Drawing into Revit
Once your DWG AutoCAD file is clean and properly scaled, open Revit and create a new project using an appropriate template, such as the Architectural Template.
Linking vs. Importing CAD Files in Revit
The best thing about Revit is that it allows for direct import or linking of CAD DWG files.
Linking a DWG AutoCAD file keeps the Revit project lightweight and allows updates from AutoCAD to be reflected in your Revit project.
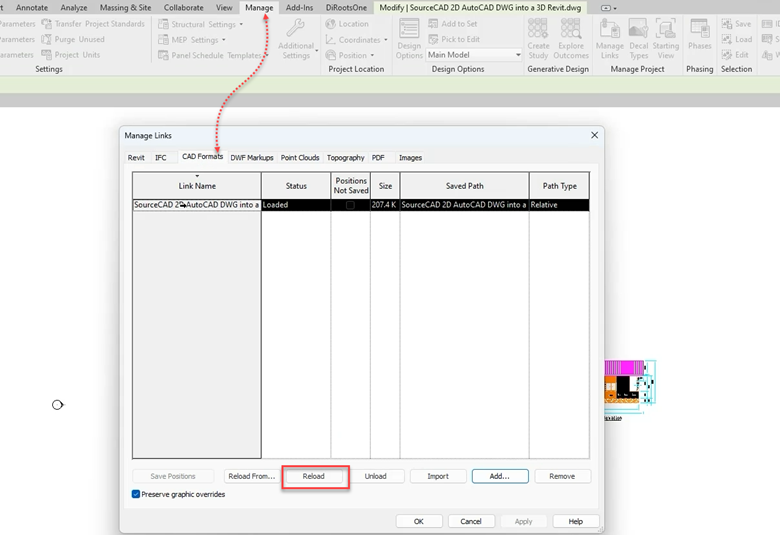
To manage linked files, go to Manage > Manage Links > CAD Formats, where you can reload updated DWG files as needed, as shown in the exhibit below.
When you import, it embeds your 2D AutoCAD file into Revit, which can increase file size and limit updates.
For large or evolving projects, linking is usually the better choice.
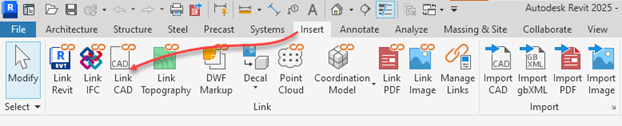
To import the CAD files into Revit navigate to Insert > Link > Link CAD.
Select the DWG file, and use Auto-Centre to Centre or Origin to Origin for accurate positioning.
After importing, adjust your Revit visibility settings by navigating to Visibility/Graphics Overrides (VG) to control the display of layers, line weights, and colors, ensuring a clear and uncluttered workspace.
Link CAD and Import CAD Revit options.
At this point, you’ll be presented with several options to fine-tune the import process.
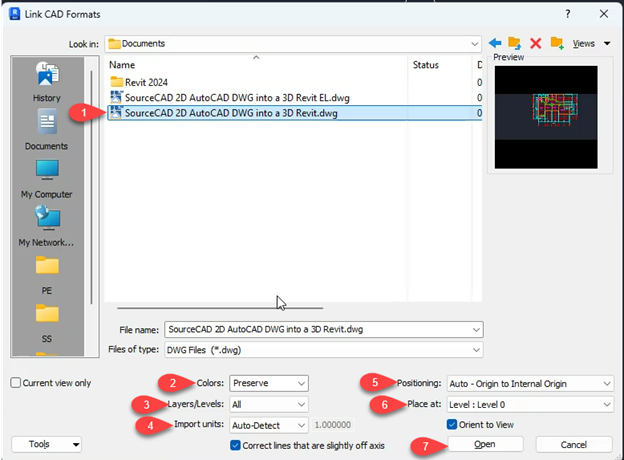
First, decide whether you want to maintain the original colors from the AutoCAD file or convert everything to black and white.
If the colors in the original file are distracting, selecting black and white can help improve clarity while modeling in Revit.
Next, choose the specific layers or levels you want to import.
By default, Revit allows you to bring in all layers, but in cases where you only need specific elements, deselecting unnecessary layers can keep your file lightweight and organized.
The Import Units setting is crucial at this stage.
If the units in AutoCAD and Revit were set correctly beforehand, this step should automatically match them.
However, if you notice that your drawing appears too small or too large after import, this usually means there is a mismatch in units.
You can always return to original drawing and change the units in AutoCAD, and re-export the file to ensure accuracy.
Positioning is another key factor when placing your CAD file in Revit.
If you are working with known coordinates, such as satellite data or georeferenced points, it is best to use Auto-Origin to Internal Origin to ensure proper alignment.
This option helps prevent unexpected shifts in the model that can happen when working on large-scale projects.
Before finalizing the import, specify the level at which the CAD file will be placed.
If you’re adding a floor plan, make sure it matches the correct level in your Revit project.
Once everything is set, click Open, and Revit will link the CAD file to your project.
Now that you’ve imported your AutoCAD drawing and ensured it’s correctly scaled, you can begin tracing over it to develop your Revit model.
Ensuring the Correct Drawing Scale When Importing AutoCAD Files into Revit
Make sure you look at your drawing scales so that you won’t end up with a messed-up model.
If your scale is off, critical elements can be misaligned, making your entire model inaccurate and unusable for construction.
To mitigate this issue, ensure that your AutoCAD drawing and Revit model are using the same measurement units to avoid these issues.
To do this in AutoCAD, type UN command for units in the command line and confirm the working measurement system and units, whether metric (millimeters, meters) or imperial (feet, inches).
The same thing should be done in Revit, make sure that your model’s settings align with the same unit system from AutoCAD.
Converting AutoCAD 2D Lines into Revit Walls
Once you have imported or linked your 2D AutoCAD drawing into the Revit project, next is to convert those flat lines into intelligent 3D Revit elements like walls, windows, doors, etc.
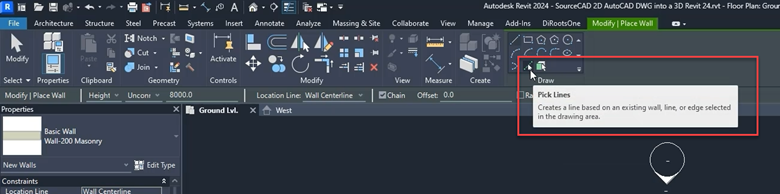
To create walls in Revit is still the same process, navigate to Architecture > Wall, but to make it easier, utilize the Pick Lines tool to pick individual 2D lines as the wall placeholder.
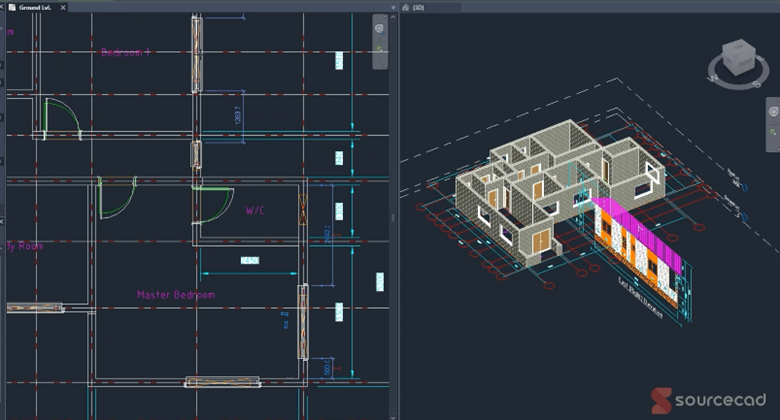
If your view is obstructed while placing windows, doors, floors, and the roof elements, switch your Graphics Display to Wireframe.
This lets you see the AutoCAD layout beneath while working as shown in the exhibit below:
Creating Elevations and Sections from the Imported CAD Drawing in Revit
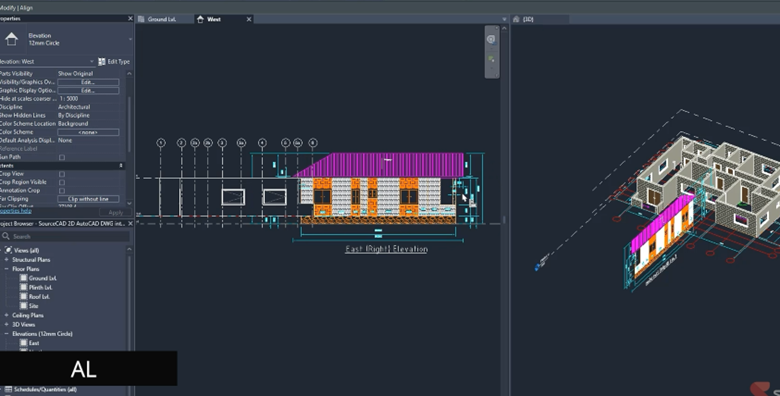
To create or view an elevation in Revit, go to View > Elevation.
Then make sure to use the alignment command, AL, to ensure that your imported 2D CAD elevation is well aligned to the existing walls around the building footprint as shown in the exhibit below:
Using Dynamo to Automate the 2D AutoCAD conversion to 3D Revit elements
Instead of manually tracing over 2D lines to create walls, you can use Dynamo scripts to convert simple 2D AutoCAD lines into 3D Revit elements, boosting your speed and accuracy.
To get started, first ensure that your AutoCAD drawing is correctly set up and imported into Revit, just as you have read in the first sections of this article.
Once your AutoCAD DWG file is in place, launch Dynamo by navigating to the Manage tab and selecting Dynamo from the Visual Programming panel as shown in the exhibit below.

Once Dynamo has launched, create a new script, and follow the process as guided below.
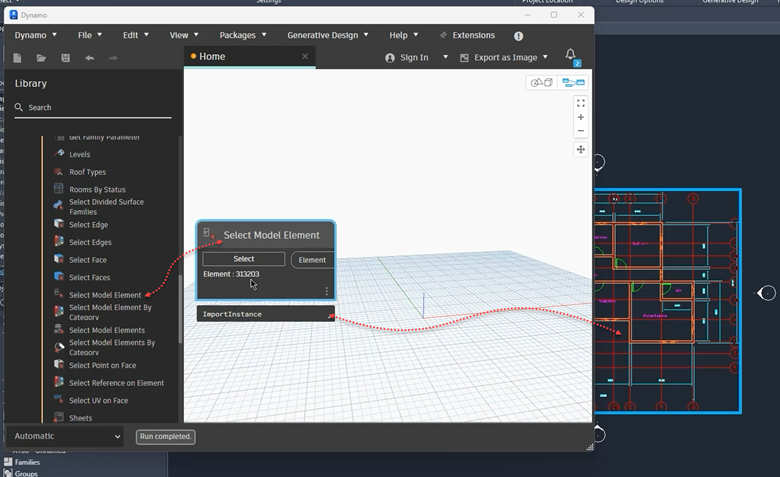
First select the imported AutoCAD DWG file as a reference and it is done by using the Select Model Element node, which allows you to pick the AutoCAD DWG file directly from the Revit interface as shown below.
Next, extract the relevant layer information from the DWG file, and then process your AutoCAD lines into Revit walls, this is achieved by a third-party Dynamo script to make things faster.
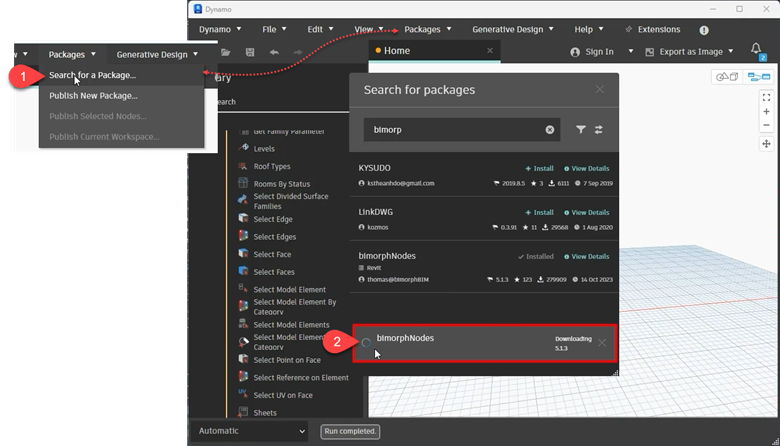
You will have to install the BimorphNodes package, as shown below, in Dynamo.
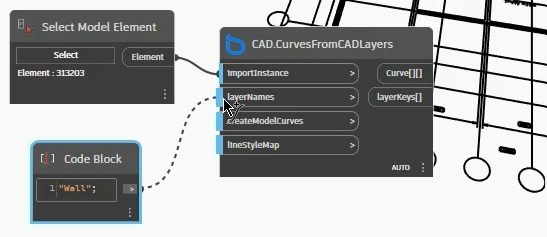
After that is done, link your ImportInstance node (which represents the AutoCAD DWG file) to the Element input into your Dynamo.
Then, use a Code Block to specify the exact layer name that contains the wall lines in the AutoCAD drawing to ensure that only the relevant geometry is extracted.
The next step is to create actual walls from these 2D AutoCAD lines by connecting the extracted linework to a Watch node, as shown below, to verify that the curves have been properly recognized.
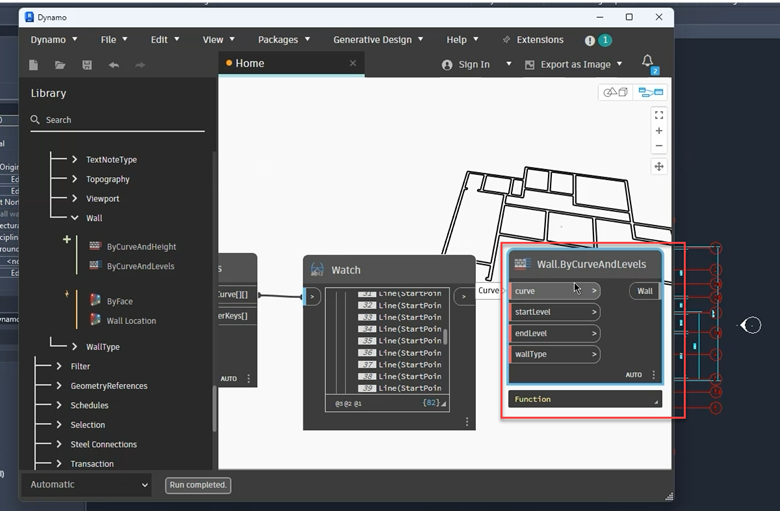
Once you confirmed that the curves are now recognizable, search for and add the Wall.ByCurveAndLevel node, as shown above, which allows you to generate Revit walls based on the imported lines.
This function requires four inputs as shown in the exhibit below:
Curves: You will have to connect this to your output from the Watch node (which contains your extracted 2D AutoCAD wall lines).
Start Level and End Level: You will have to add your two Level nodes to define your base and top constraints for your walls.
Wall Type: You will have to search for and add your Wall Types node, then select the appropriate wall type from your Revit project and connect it to the Dynamo input.
And just like that!
Dynamo will automatically generate your walls along your imported AutoCAD lines, eliminating your need for manual tracing.
And if adjustments are needed, you can modify your script parameters or fine-tune your wall alignment within Revit.
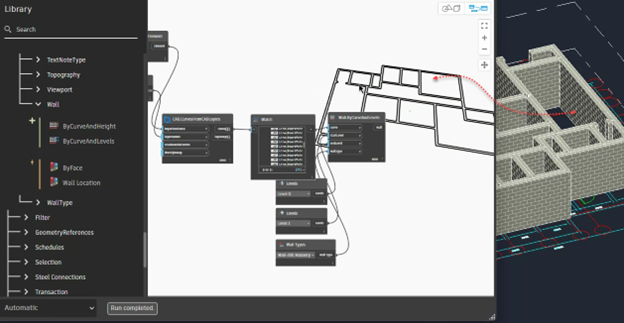
Pro Tip: Instead of using a CAD file that has double lines representing the walls, make sure to use a CAD file that has the walls represented by just a single line to avoid double-walling instances.
Exporting 3D Revit Models to AutoCAD DWG
Even better, it is still possible to export your Revit 3D models back into AutoCAD without breaking a sweat!
Navigate to the File tab, select Export, and then choose CAD Formats > DWG/DXF as shown in the exhibit below:
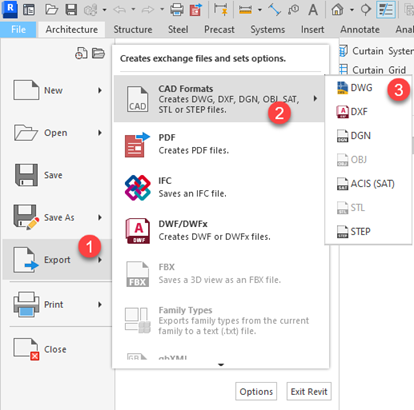
If needed, you can adjust your layer mapping and export settings to optimize how Revit categories translate into AutoCAD layers.
Once exported, your DWG file from Revit can be opened in your AutoCAD for further detailing, annotation, or coordination with other disciplines.
What Revit Cannot Import
Although your Revit software is highly adaptable, not everything from a DWG AutoCAD file translates perfectly as some complex hatches, heavily detailed annotation styles, and certain AutoCAD blocks and objects may not import concisely.
The good thing is that these issues can be mitigated by simplify your DWG AutoCAD file before import by removing all unnecessary hatches, converting custom annotation styles to standard ones, and ensuring your elements are properly layered.
Frequently Asked Questions:
Can I link the same AutoCAD DWG drawing into multiple Revit projects?
Yes, Revit allows you to link the same CAD file to multiple projects, making it easier for your work teams to collaborate without duplicating files.
Also, all updates made to the original CAD file are reflected across all your linked Revit projects in the organization.
Can I import an AutoCAD drawing into Revit and maintain all its layers?
Yes.
When importing an AutoCAD DWG file into Revit, you can choose to preserve all your layers.
This can then be managed through Revit’s visibility and graphic controls and also, you can proceed to hide or turn off certain layers within Revit that you prefer not to see within the project design phase.
Can you automate the conversion of 2D AutoCAD drawings into 3D Revit models?
Absolutely yes!
By leveraging the power of tools like Dynamo, you can automate many aspects of the conversion from 2D non-intelligent CAD lines to 3D intelligent BIM elements, reducing manual effort and increasing accuracy in your projects.
Summary
The successful conversion of your 2D AutoCAD drawings into 3D Revit models requires careful planning to ensure accuracy in your projects.
So, whether you’re linking, importing CAD drawings directly, or using Dynamo, the key is to understand the tools at your disposal, and how to use them.
Let us know your experience and challenges converting 2D AutoCAD files into 3D Revit models, in the comment section below.