Mastering Revit Worksets right from scratch
Revit worksets allows teams to effortlessly collaborate on large architectural projects without stepping on each other s toes? Picture yourself working on a…
Revit worksets allows teams to effortlessly collaborate on large architectural projects without stepping on each other’s toes?
Picture yourself working on a massive project with your team where each member is handling their part smoothly, the architects, structural engineers, MEP Engineers, etc.,
Well…
This is all possible thanks to Worksets.
In this article, I will walk you through everything you need to know about Worksets in Revit, from enabling them to mastering their use for enhanced collaboration.
Understanding Worksets:
Worksets in Revit act like virtual containers, grouping specific elements such as doors, walls, grids, floors, or mechanical systems.
It’s icon is represented as shown:

Each Workset is managed based on ownership, allowing companies, or team members, like yourself to work independently on your designated parts of the project.
For example, while the architectural team focuses on building elements, the structural team can handle beams and columns, and the MEP team can model the HVAC and lift systems, all simultaneously.
Or
If you are working with specialized companies, and different companies are responsible for supplying different materials for the construction, e.g. steel column, precast slabs, landscaping etc., you can define each Workset with the company responsible for each scope.
Common Terms Associated with Worksets:
Before we dive deeper, let's clarify some terms:
Worksharing
Worksharing in Revit is a feature that let's multiple team members work on the same model at once, promoting collaboration, while a Workshared file is a Revit file where Worksets are enabled, allowing multiple users to collaborate.
Cloud Worksharing in Revit is storing a workshared model in the cloud, facilitating collaboration.
Collaboration
Collaboration in Revit is the process of different project members or companies working together, often across different disciplines or work scope.
Central File
The Central file is the main file for workshared projects, storing ownership details and all changes, while the Local file is a copy of the central file that each company or team member works on, syncing changes with the central model.
Borrowing
In Revit, Borrowing is a feature that allows you to temporarily edit elements you don't own, while File-based Worksharing is the storing of a workshared model on a network.
Enabling Worksets in Revit:
Enabling Worksets in Revit is essential for seamless collaboration, you first need to be working on a collaboration project.
You will know if you are working on a collaboration project if it has the icon shown below.
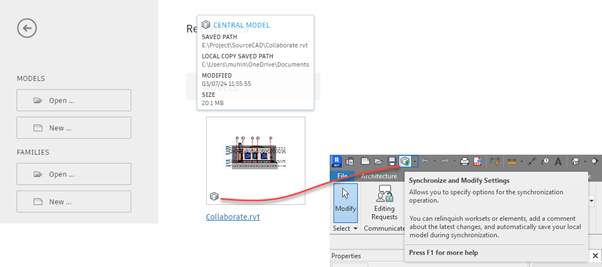
If it is not set, you can set your model to enable Collaboration, either by cloud or local, using the Collaborate command under the Manage Collaboration under the Collaborate tab as shown below:
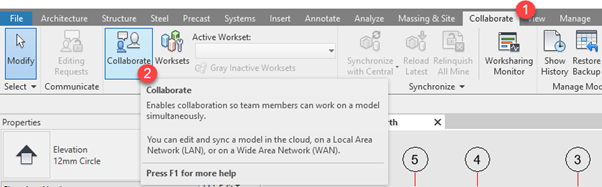
After clicking on the Collaborate command, the Collaborate menu will pop up, and you can select the option that suits your needs.
In this case, select the "Within your network" option and click on OK.
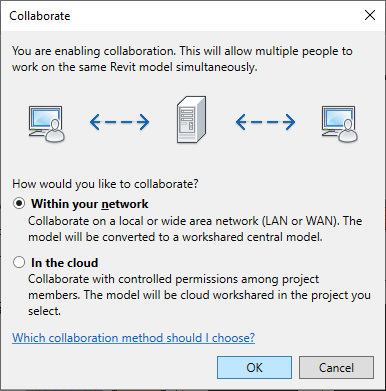
Once that is done, Revit will run the command that will enable Worksharing within the project that you are working on.
Make sure to save the Revit Project File on the server, or common folder after enabling Collaboration, thus making it the Central Model.
Then for best practice, generate a local copy for each company or team member to work on their specific Workset and ensure you give each copy a descriptive name and specify it's location on your network.
Creating and Managing Worksets:
Now that Collaboration is enabled, you can create custom Worksets to organize project elements effectively.
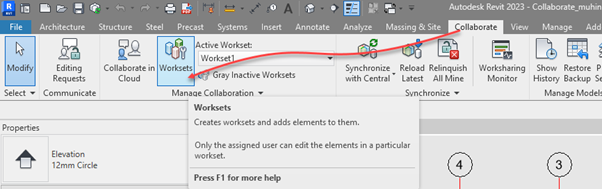
Still, under the Collaborate tab under the Manage Collaboration panel, click on Worksets to access the Worksets dialogue box.
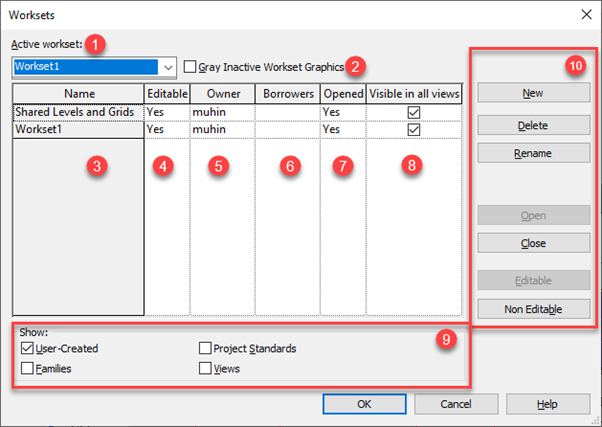
Here is a description of the options from the illustration above:
1. Active Workset:
When you specify an Active Workset in Revit, you're designating the specific Workset where your current editing actions, such as creating or modifying elements, will take place.
These Worksets behave like layers in that, whatever is found within the Workset will be treated to share common properties.
Use logical names to clarify each discipline's or linked files' Workset, and manage them efficiently using the Worksets dialogue.
2. Gray Inactive Workset Graphics:
Worksets marked as "Gray Inactive" indicate elements that are not actively being edited or modified at the moment.
Although elements within Gray Inactive Worksets remain visible and accessible in the project, they are not the main focus of your current editing tasks.
Utilizing Gray Inactive status helps organize project elements visually, providing clarity on which elements are actively being worked on and which are not.
You can toggle the status of a Workset between Active and Gray Inactive based on your editing tasks and project requirements.
3. Workset Name:
This is where you can see the names of all the Worksets currently defined in your project.
Each Workset represents a distinct grouping of elements within your project, such as architectural elements, structural components, MEP systems, or company names.
4. Editable:
This parameter indicates whether a Workset is editable or not.
When a Workset is set to "Yes," it means that the elements within that Workset can be modified by you, if you have ownership of the Workset.
Setting a Workset to "No" restricts editing privileges to prevent unintentional changes to critical project elements.
5. Owner:
You are the owner of a Workset, you have the authority to make changes to the elements within that Workset.
This parameter displays the username of the current owner, although only one user can be the owner of a Workset at any given time.
As an owner, you can transfer ownership to other users as needed.
6. Borrowers:
This section displays the usernames of users who have borrowed elements from the Workset for editing.
When you borrow an element, you temporarily gain ownership of that element and can make changes to it.
Borrowing ensures that only you can edit a specific element at a time to prevent conflicts.
7. Opened:
This parameter indicates whether your Workset is currently opened or closed.
When your Workset is closed, it's elements are unloaded from memory, improving performance by reducing the amount of data Revit needs to manage.
Closing unused Worksets can help streamline your workflow and optimize performance.
8. Visible in all views:
This option allows you to control the visibility of elements within a Workset across all views in your project.
When enabled, elements in the Workset are visible in all views by default, while disabling this option allows you to selectively control the visibility of elements in individual views using the Visibility/Graphics Override settings.
9. Show:
This option allows you to control the visibility of the Workset itself within the project environment.
When enabled for a Workset, it means that the Workset is visible in the Workset dropdown menu and can be selected for viewing or editing.
This option is particularly useful when you have numerous Worksets in your project, and you want to focus on specific ones for editing or review.
10. Manage Worksets:
This section provides additional options for managing Worksets within your project.
You can create new Worksets, delete existing ones, or rename them as needed.
Renaming a Workset requires ownership of the Workset, indicated by setting the "Editable" parameter to "Yes."
Assigning Elements to Worksets:
Still within the “Workset dialogue” click on New to create a Workset.
In this case, name it as SourceCAD, check on the option to make visible in all views, then click on OK.
To close from the dialogue, click on OK to save changes, you will be prompted if you want to make the newly created Workset to be the active Workset, click on OK as illustrated below:
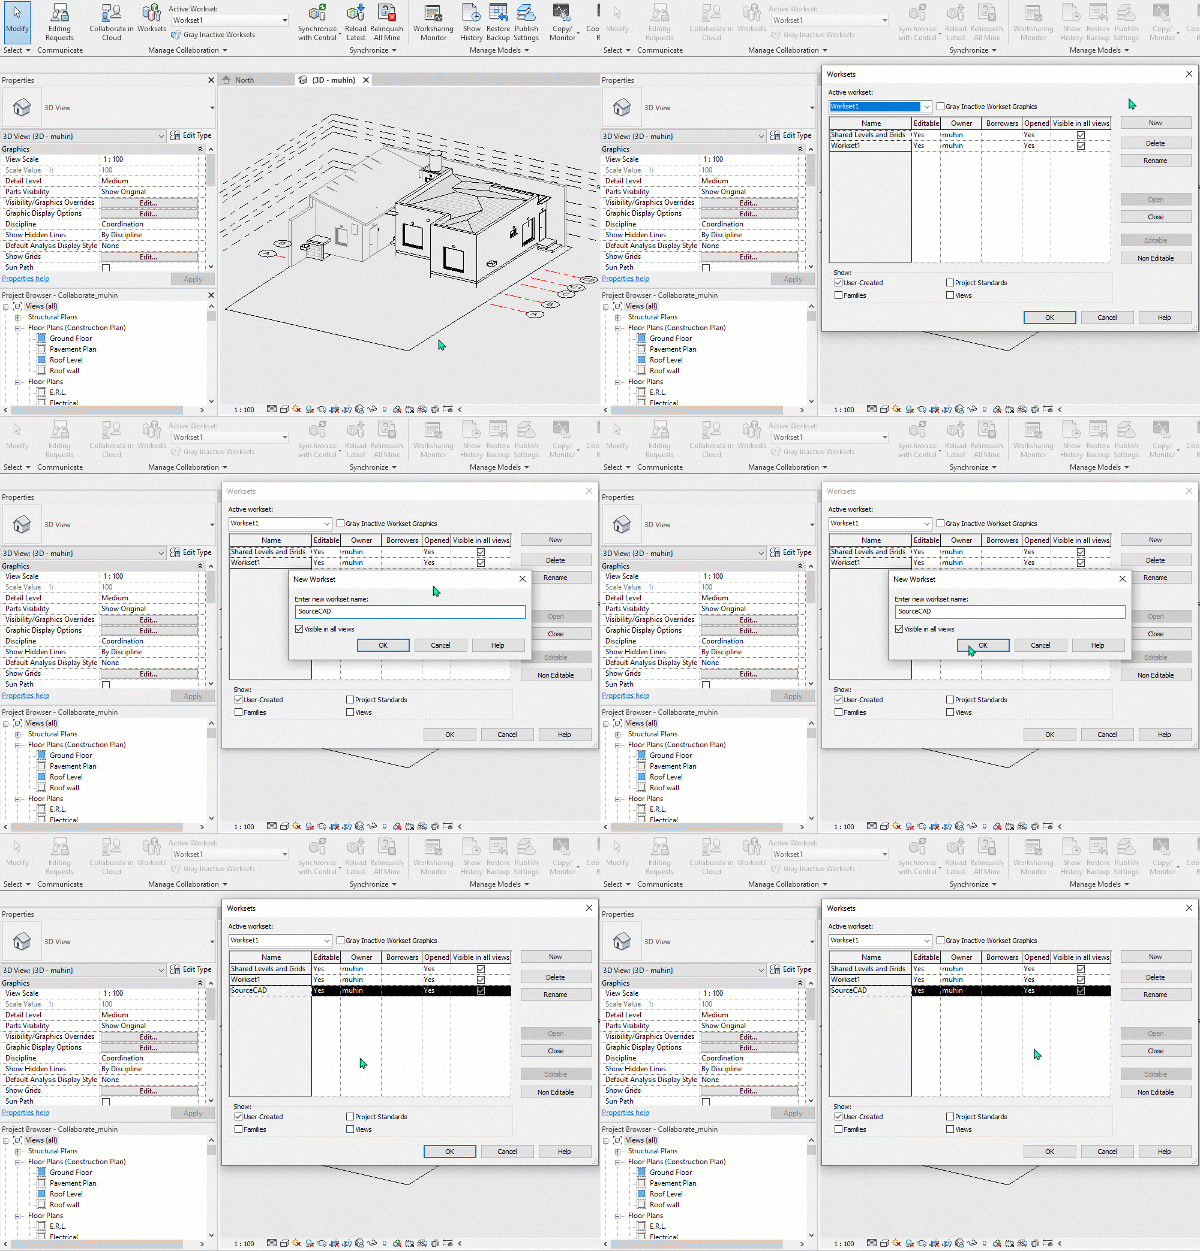
To assign elements to a Workset, set the active Workset first.
In our case, SourceCAD Workset is active, then click on any element, either individually or as a group, and under the Properties palette, navigate to the Identity Data section and specify your preferred Workset which in this case is SourceCAD.
To achieve this, follow the steps as illustrated below:
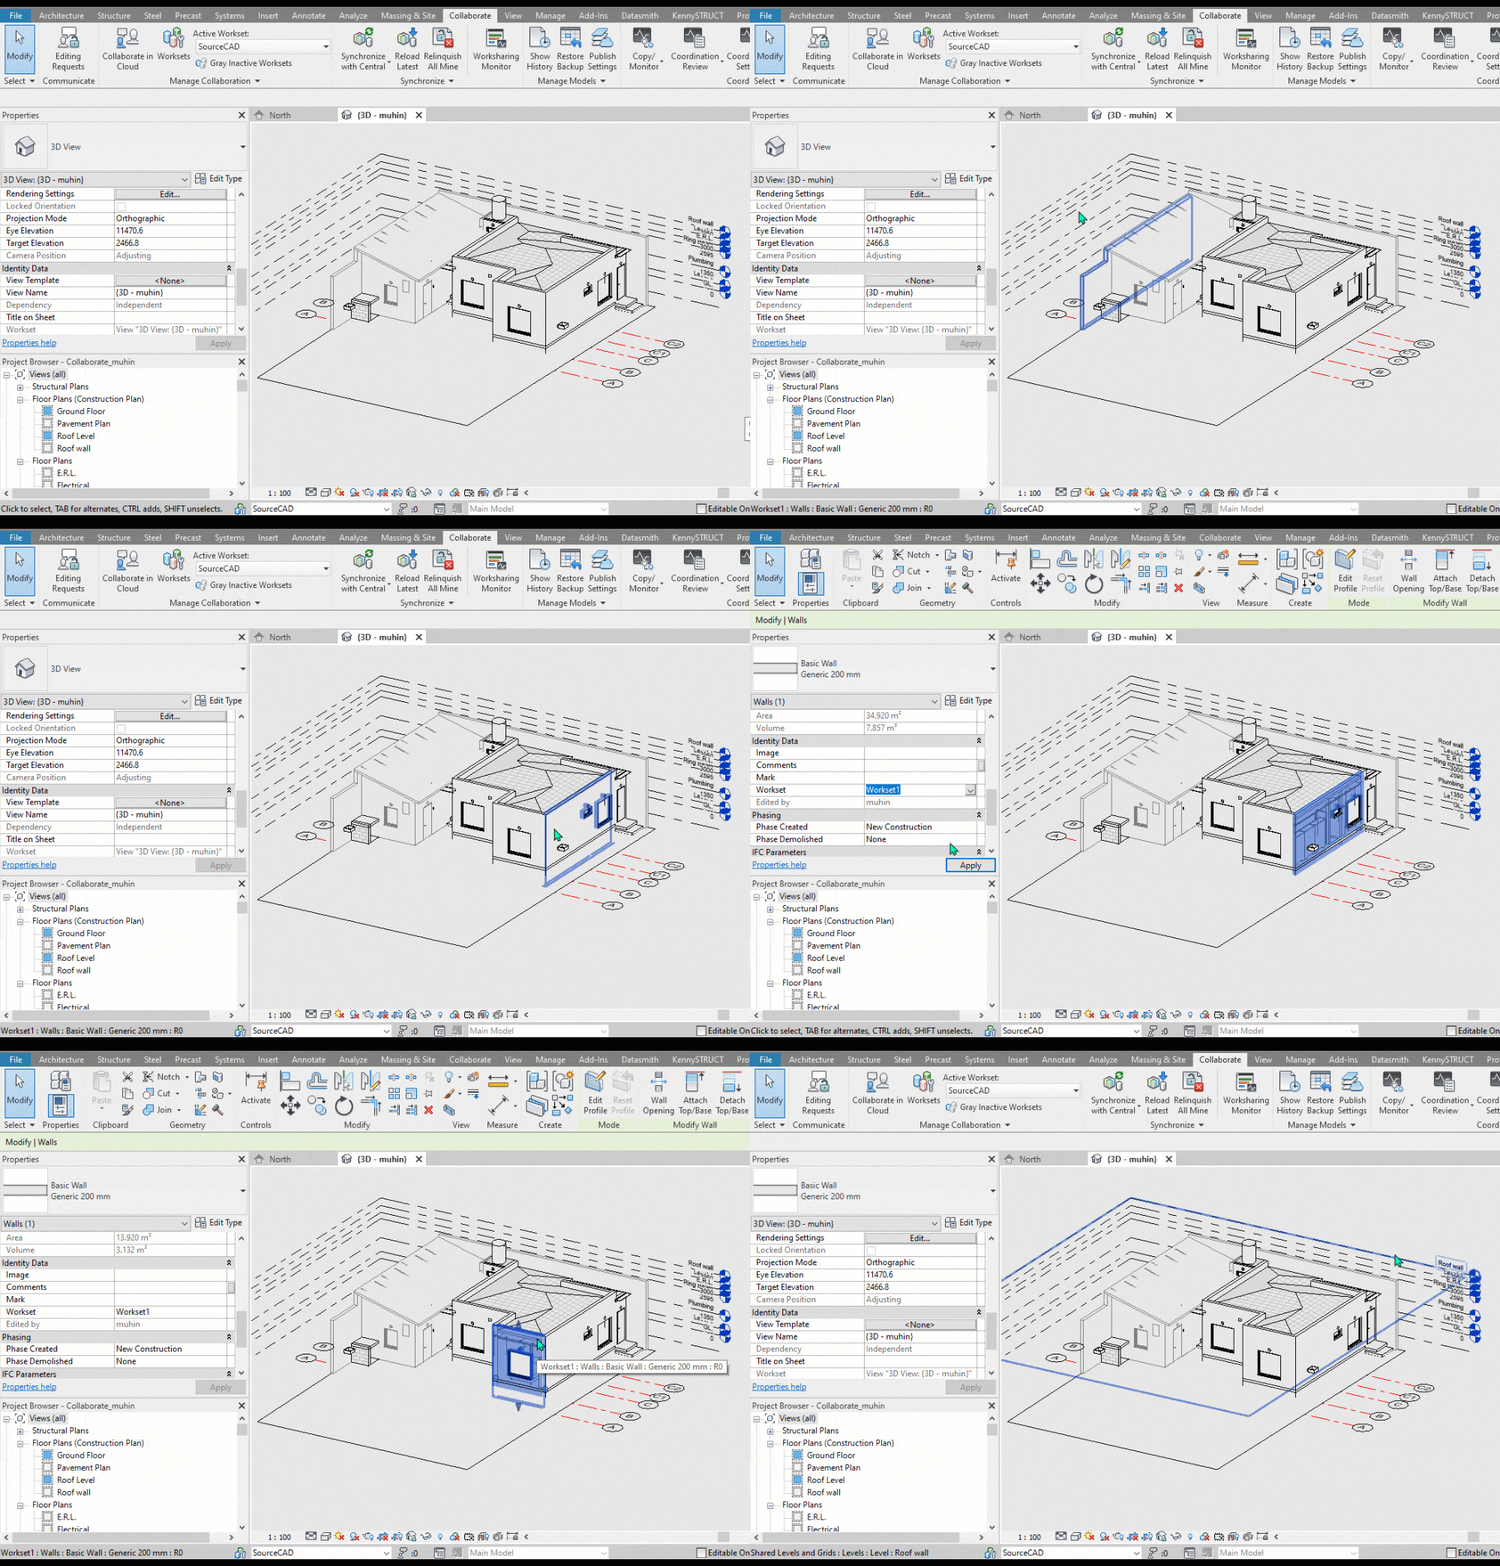
It is important to note that, if any elements created afterwards will belong to that specific Workset.
You can also change the Workset of existing elements using the Properties Browser.
Ensure proper coordination with your team to avoid conflicts and maintain data integrity.
Sync and Relinquish Worksets:
If you need to transfer ownership of elements, use the sync and relinquish functions in Revit.
This allows you to synchronize changes with the central model and relinquish ownership of borrowed elements, ensuring smooth collaboration among team members.
In this case, after we have assigned some of our model elements to the SourceCAD workset, navigate to the Synchronize panel under the Collaborate tab and click on the Synchronize with Central command.
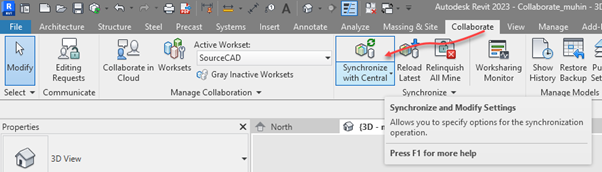
The Synchronize with Central window will pop up, where you will have options such as to relinquish your rights to the workset.
Relinquishing your rights to a Workset in Revit is crucial for smooth collaboration.
When you relinquish rights, you transfer ownership to another user, preventing conflicts and ensuring efficient editing.
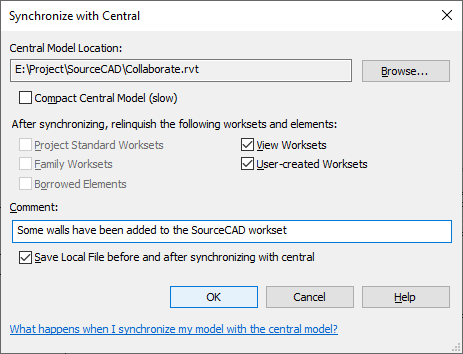
Therefore choose "Relinquish All Mine," you can choose to add a comment, then click on OK.
Visibility Settings and Worksharing Display
Revit offers visibility settings and a Worksharing Display tool to help you visualize Workset ownership, element status, and associated Worksets.
Use these tools to monitor project progress and identify potential conflicts or bottlenecks.
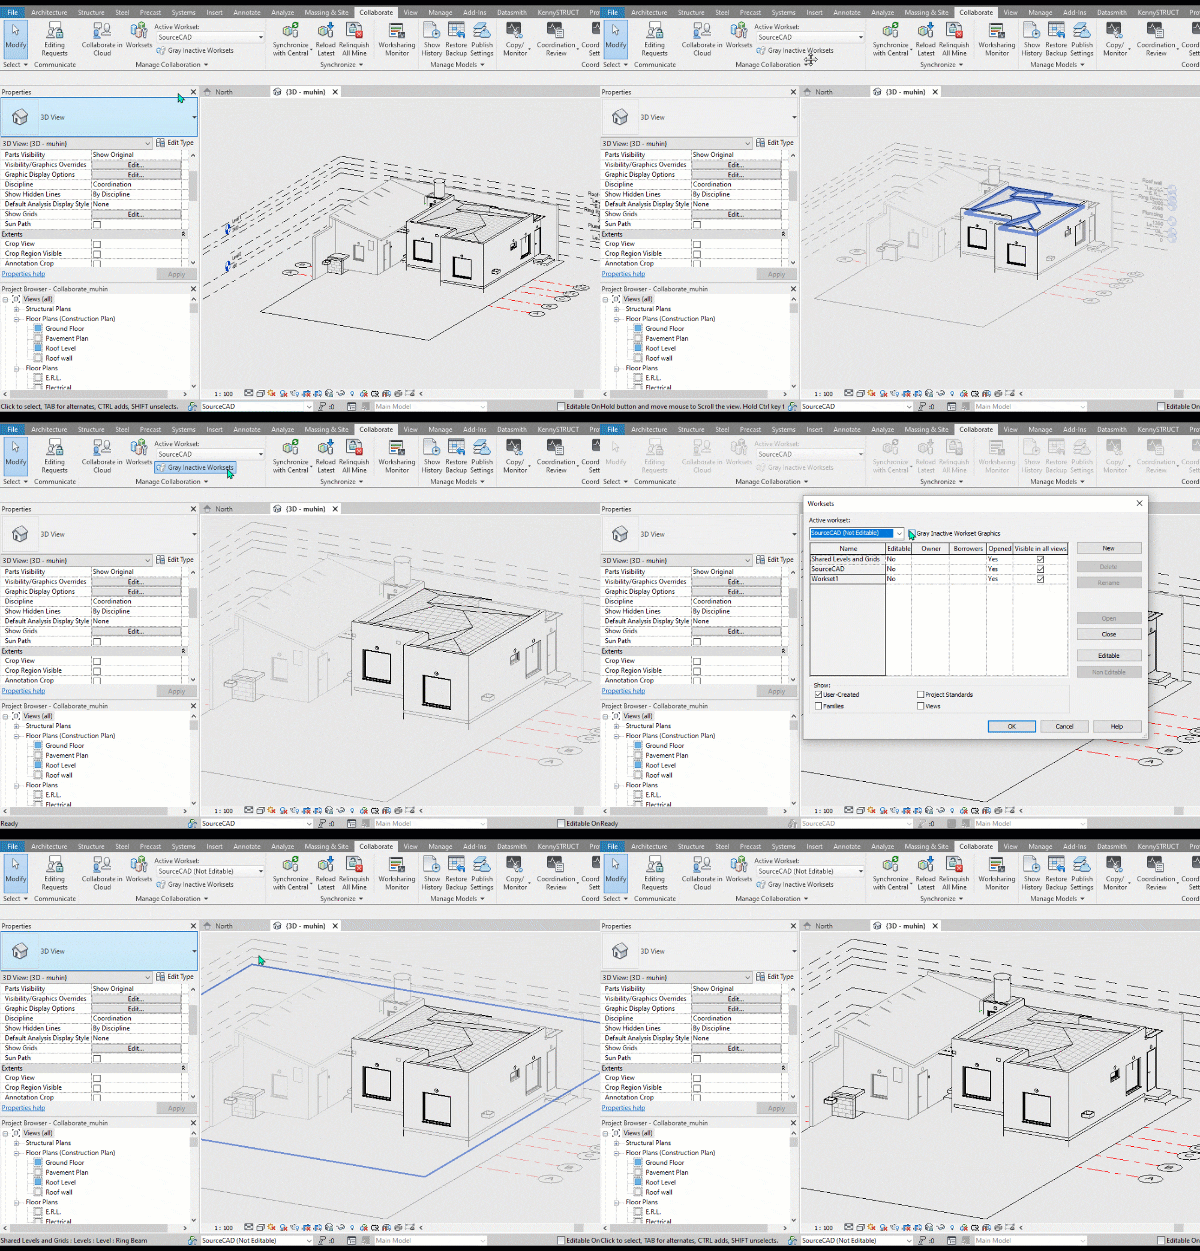
In this case, you can click on the Gray Inactive Worksets command, which is found under the Manage Collaboration panel under the Collaborate tab, to view the items that you added to the SourceCAD Workset.
Tips & Tricks for Efficient Workset Management:
Use separate Worksets for linked files to control visibility and manage resources efficiently.
You can utilize View Templates to automate Visibility/Graphics Override settings for Worksets.
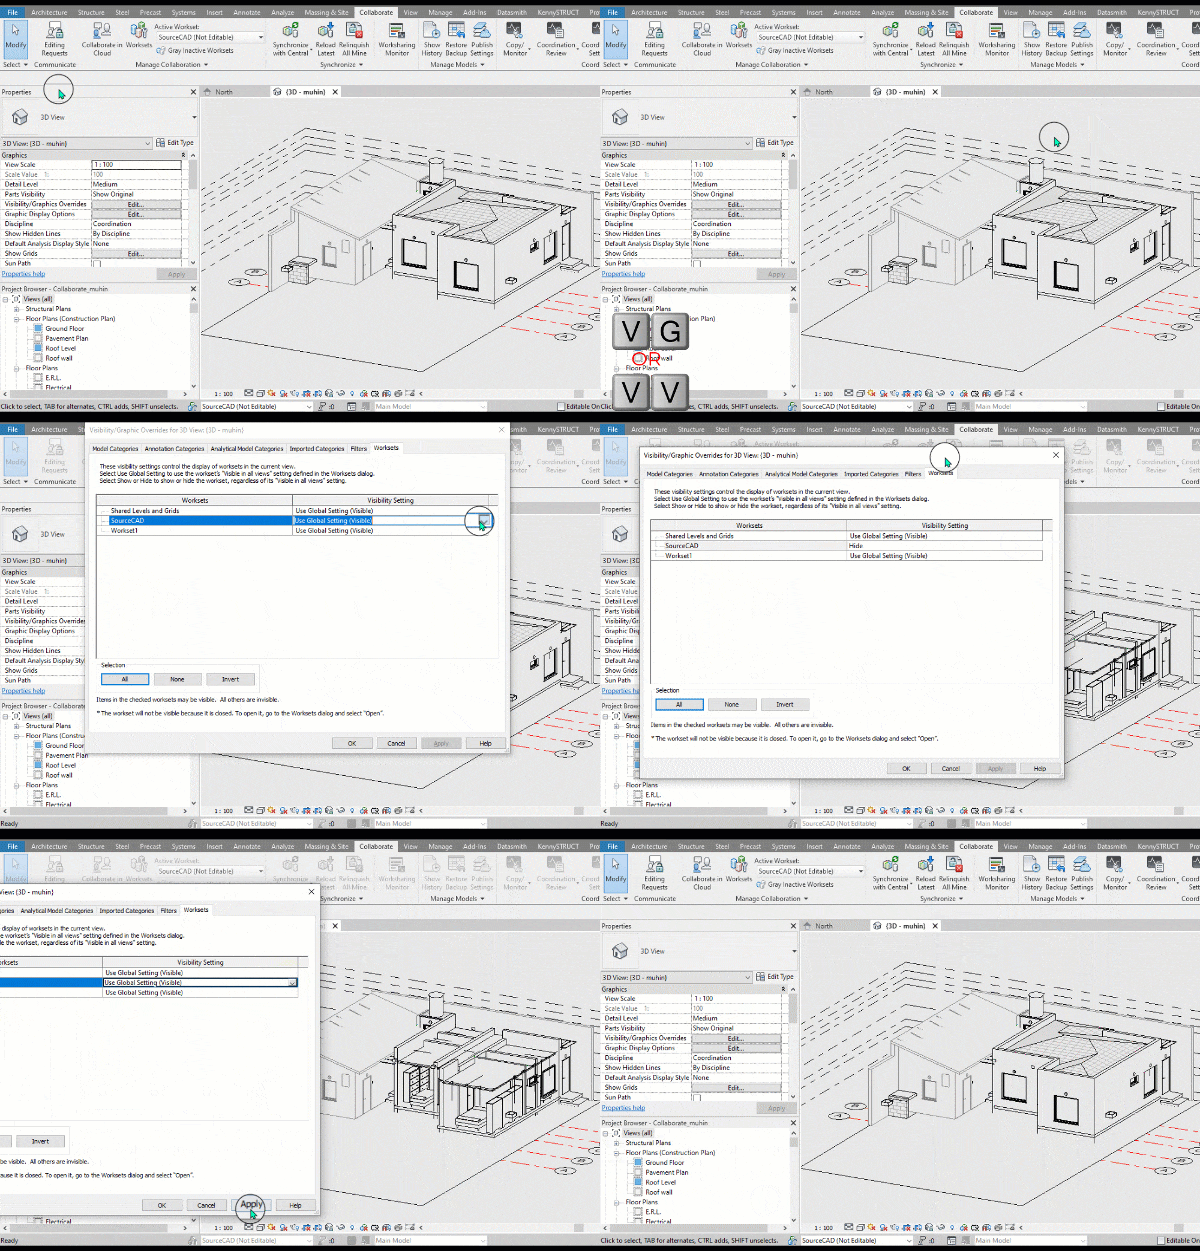
In this case, activate the Visibility/Graphics Override settings by using the keyboard shortcut VV or VG launch it.
Once launched, navigate to the Workset tab and under there you can modify your setting appropriately as shown below:
Additionally, ensure you regularly clear the Revit Collaboration Cache to free up disk space and optimize performance.
If you are a beginner in Revit architecture, you could start by first experimenting with Worksets on a small test project to understand their functionality and usability better.
Frequently Asked Question Section:
Here are some of the questions that our users have frequently asked about Revit worksets.
Can multiple team members work simultaneously on different Worksets?
Yes, Revit allows multiple team members to work simultaneously on different Worksets within the same project, facilitating collaborative editing.
What is the difference between a Revit Workset and a Revit Filter?
A Revit Workset organizes project elements based on ownership for collaborative editing, while a Revit Filter controls the visibility and graphic display of elements in views.
Worksets manage ownership, and Filters control visibility.
What is the best practice for naming Worksets?
It's essential to use descriptive names for Worksets that reflect the type of elements they contain, such as "Architectural Walls" or "MEP Plumbing Fixtures."
This helps team members quickly identify and navigate Worksets within the project.
If you are working with sub-contractors from different companies, you can opt to use the names of the companies instead to make tracking easier.
Summary
Congratulations! You've taken the first steps towards mastering Revit Worksets.
By enabling Worksets, organizing project elements, and controlling visibility and access, you're well on your way to seamless collaboration on your architectural projects.
If you have any questions or need further assistance, feel free to ask in the comments below.